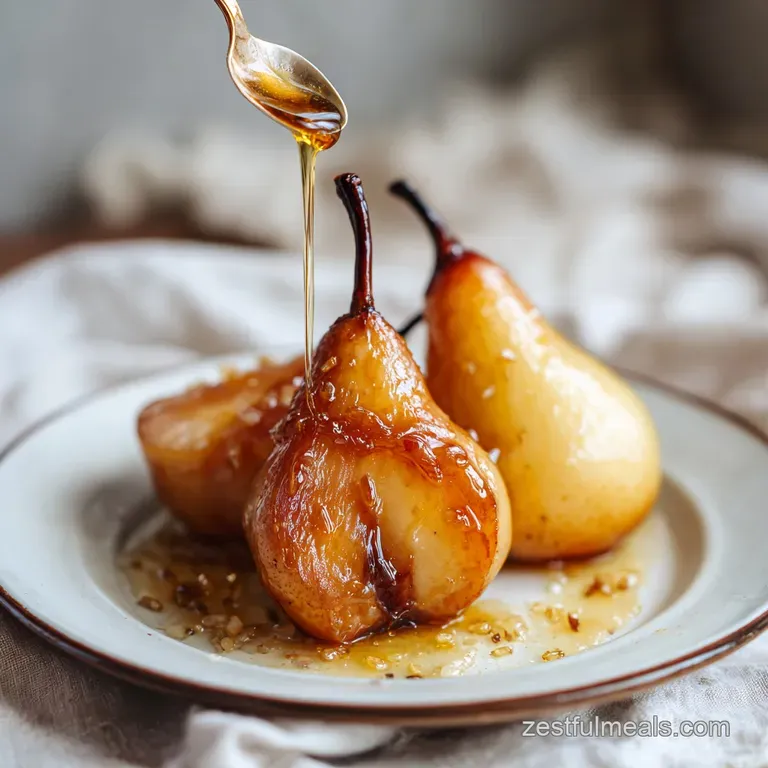
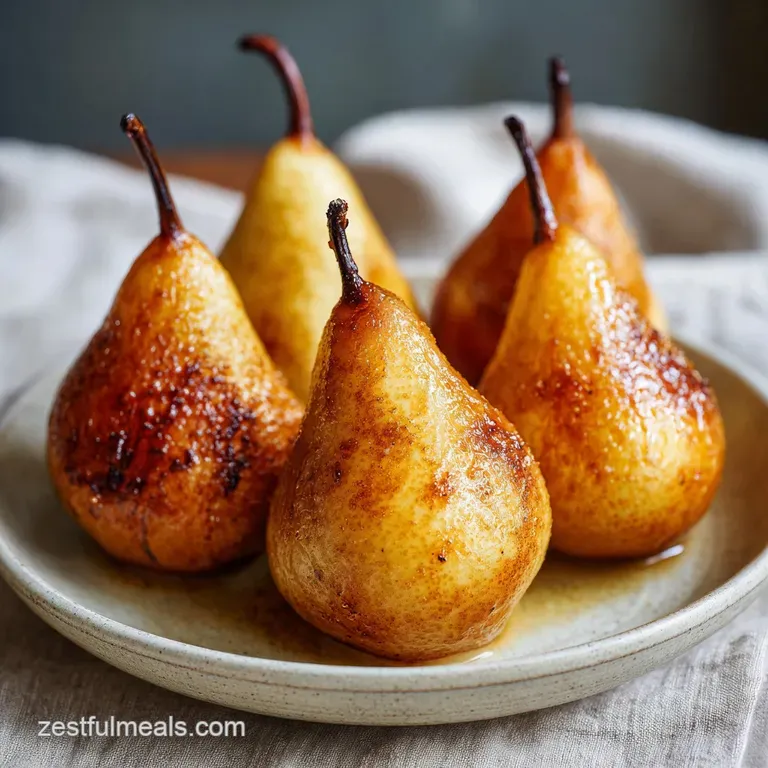
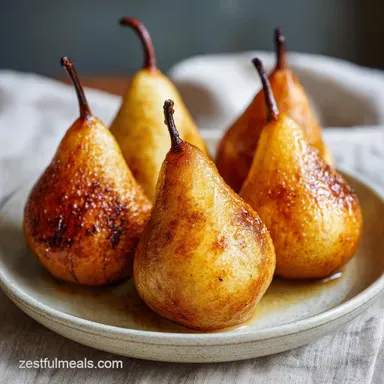
Buttery Roasted Pears
- Time: Active 10 minutes, Passive 35 minutes, Total 45 minutes
- Flavor/Texture Hook: Silky centers with caramelized edges
- Perfect for: Stress free dinner parties or a cozy weekend treat
- Mastering these tender Buttery Roasted Pears
- Essential Recipe Specifications
- Understanding Your Key Components
- Gathering Your Kitchen Tools
- Executing the Perfect Bake
- Avoiding Failures and Fixes
- Creative Flavor Variations
- Proper Storage and Scraps
- Creating Ideal Flavor Pairings
- Summary of the Method
- Recipe FAQs
- 📝 Recipe Card
Mastering these tender Buttery Roasted Pears
I'll never forget the first time I tried roasting fruit. I was trying to impress my in laws and ended up with what I can only describe as "lukewarm fruit soup." I had picked pears that were way too ripe, and they basically dissolved the second the heat hit them.
It was a mushy, watery mess that even a gallon of ice cream couldn't save. I almost gave up on the idea entirely, thinking fruit belonged in pies or nowhere at all.
But I'm a bit stubborn. I spent the next few months experimenting with different varieties and sugar ratios until I found the sweet spot. It turns out, the secret isn't just the fruit itself, it's how you manage the moisture and the fat.
Now, when I pull a tray of Buttery Roasted Pears out of the oven, the house smells like a high end French bakery, and the sauce is so thick it clings to the spoon.
We are going for that specific moment where the pear is soft enough to yield to a dessert spoon but firm enough to hold its elegant shape on the plate. If you've struggled with soggy fruit or burnt sugar in the past, don't worry.
I've made those mistakes for both of us, and I'm going to show you exactly how to avoid them so you get that perfect, glassy glaze every single time.
Essential Recipe Specifications
The Pectin Transformation
Roasting fruit is a race between sugar caramelization and structural collapse. As the heat rises, the pectin in the pear's cell walls breaks down into a soft, velvety texture while the added sugar draws out internal juices to create a self basting syrup.
Pear Ripeness Guide
| Pear Variety | Best Ripeness | Final Texture | Visual Cue |
|---|---|---|---|
| Bosc | Very Firm | Holds shape perfectly | Skin is matte and brown |
| Anjou | Slightly Firm | Soft and juicy | Skin feels like a tennis ball |
| Bartlett | Very Firm | Silky but delicate | Pale green with no spots |
Choosing the right pear is 90% of the battle here. If you use a pear that is already soft enough to eat out of hand, it will turn to mush in the oven. Look for fruit that feels like a piece of wood when you squeeze it.
It sounds counterintuitive, but the oven will do the softening for you, and starting firm ensures you don't end up with a plate of baby food.
Understanding Your Key Components
| Ingredient | Science Role | Pro Secret |
|---|---|---|
| Bosc Pears | Structural Base | Keep the stems on for a beautiful, bistro style presentation. |
| European Butter | Fat Emulsion | Use butter with 82% fat to ensure the sauce doesn't separate. |
| Brown Sugar | Humectant | The molasses content prevents the fruit from drying out during the bake. |
| Lemon Juice | Enzyme Inhibitor | This prevents the fruit from turning an unappetizing grey color. |
For the Pear Base
You will need 4 large Bosc or Anjou pears, firm to the touch. I prefer Bosc because their long necks look stunning when plated. You'll also need 1 tbsp fresh lemon juice. Why this? The acidity balances the sugar and keeps the flesh bright and white.
For the Buttery Glaze
The heart of this dish lies in the sauce. You'll need 4 tbsp unsalted European style butter and 1/4 cup light brown sugar, packed. To round out the flavor, grab 1 tsp pure vanilla bean paste and 1/2 tsp ground Ceylon cinnamon.
Why this? Vanilla paste provides those beautiful black speckles that look so professional.
For the Final Flourish
Don't forget the 1/4 tsp flaky sea salt to cut through the sweetness. If you want a bit of texture, 1/4 cup toasted walnut pieces (optional) and some fresh mint leaves for garnish will make the dish pop. If you're planning a full menu, these pears are a great follow up to a heavier main like my Eye of Round Roast recipe.
Gathering Your Kitchen Tools
You don't need a lot of fancy gear, but a few specific tools will make your life much easier. First, a sturdy 9x13 inch baking dish is essential. Avoid using a flat cookie sheet, as the juices will run everywhere and potentially burn on the bottom of your oven.
A glass or ceramic dish is ideal because it holds heat evenly and makes the cleanup of sticky sugar much easier later on.
A melon baller is my favorite "secret weapon" for this recipe. It allows you to scoop out the core and seeds in one clean motion, leaving a perfect little well for the butter and sugar to pool into. If you don't have one, a small measuring spoon works, but the melon baller gives you that professional, rounded look.
Chef's Tip: Freeze your butter for 10 minutes before you start. Grating the cold butter into the sugar mixture instead of melting it ensures the glaze stays thick and doesn't just run off the fruit immediately.
Executing the Perfect Bake
- Heat the oven. Preheat your oven to 400°F (200°C) and ensure the rack is in the center position.
- Prep the fruit. Peel the 4 large Bosc or Anjou pears, leaving the stems intact. Note: peeling allows the glaze to penetrate the flesh.
- Halve and core. Slice each pear in half lengthwise and use a melon baller to remove the core.
- Acidulate. Rub the 1 tbsp fresh lemon juice all over the cut sides of the pears. Note: this stops oxidation immediately.
- Make the mixture. In a small bowl, combine the 4 tbsp unsalted European style butter, 1/4 cup light brown sugar, 1 tsp pure vanilla bean paste, and 1/2 tsp ground Ceylon cinnamon.
- Arrange in dish. Place the pears cut side up in the baking dish. Note: they should fit snugly but not be overlapping.
- Fill the wells. Divide the butter and sugar mixture evenly among the hollowed out centers of the pears.
- Initial roast. Bake for 20 minutes until the butter is bubbling and the pears start to soften.
- Baste and finish. Spoon the melted juices from the bottom of the dish back over the pears and bake for another 15 minutes until the fruit is tender and the sauce has thickened into a syrup.
- Rest and serve. Remove from the oven, sprinkle with 1/4 tsp flaky sea salt and 1/4 cup toasted walnut pieces, then let rest for 5 minutes before serving.
Just like when making my Garlic Herb Roasted recipe, the preheating step is vital. If the oven isn't hot enough when the pears go in, they will steam rather than roast, and you'll lose that beautiful caramelization on the edges.
Avoiding Failures and Fixes
Preventing Fruit Collapse
If your pears are starting to slump or lose their shape, they are likely overcooking or were too ripe to begin with. You can save them by pulling them out of the oven immediately and letting them cool in the fridge.
The cold will help the pectin firm back up, and while they might not be as "stately," they will still taste incredible.
Fixing Broken Glazes
Sometimes the butter and sugar don't play nice, and the sauce looks oily or separated. This usually happens if the heat is too high or if you didn't whisk the basting juices enough. A quick fix is to whisk in a teaspoon of hot water or heavy cream directly into the pan juices once the dish is out of the oven.
This helps re emulsify the fats.
| Problem | Root Cause | Solution |
|---|---|---|
| Pears are tough | Fruit was too underripe | Increase bake time by 10 minutes and cover with foil. |
| Sauce is burnt | Not enough moisture in the pan | Add 2 tablespoons of water or apple juice to the dish. |
| Fruit is grey | No lemon juice used | Brush with a little honey or maple syrup to mask the color. |
Common Mistakes Checklist
- ✓ Always use firm pears; soft fruit will disintegrate.
- ✓ Leave the stems on for a more elegant presentation.
- ✓ Don't skip the salt; it's what makes the caramel flavor complex.
- ✓ Baste halfway through to ensure the tops don't dry out.
- ✓ Let the dish rest for 5 minutes so the syrup can thicken properly.
Creative Flavor Variations
If you want to move away from the classic vanilla and cinnamon, there are plenty of ways to spice this up. I love adding a splash of bourbon or dark rum to the butter mixture for a "grown up" version. The alcohol cooks off, leaving behind a deep, smoky sweetness that pairs perfectly with the pears.
For a more floral profile, try swapping the cinnamon for ground cardamom or even a few sprigs of fresh thyme. Thyme might sound like it belongs in a savory dish, but its earthy notes are a brilliant contrast to the sugary glaze.
If you're feeling adventurous, a tiny pinch of black pepper in the sugar mixture can add a surprising heat that makes people stop and ask, "What is that secret ingredient?"
| Original Ingredient | Substitute | Why It Works |
|---|---|---|
| Light Brown Sugar | Maple Syrup | Adds a woodsy flavor. Note: Syrup is thinner, so reduce slightly. |
| Walnuts | Pecans | Similar fat content but a sweeter, more buttery crunch. |
| Vanilla Bean Paste | Almond Extract | Provides a cherry like aroma that complements the fruit. |
For a festive holiday spread, this fruit dish complements a Recipe Pineapple Stuffing beautifully, offering a different kind of fruit forward side that clears the palate.
Proper Storage and Scraps
If you find yourself with leftovers, which is rare in my house, they store surprisingly well. Put them in an airtight container in the fridge for up to 3 days. When you're ready to eat them again, I recommend reheating them in a 350°F (180°C) oven for about 10 minutes rather than using the microwave.
The oven helps the glaze regain its glossy finish, whereas the microwave can make the fruit a bit rubbery.
Don't throw away those pear peels or the cores! You can simmer the scraps with a bit of water and sugar to make a quick pear syrup. This is fantastic in cocktails or drizzled over oatmeal the next morning. It's a great way to practice zero waste cooking while getting every bit of flavor out of your ingredients.
I don't recommend freezing these pears. The freezing and thawing process tends to destroy the delicate cell structure of the fruit, making them very mushy once they come back to room temperature. They are definitely best enjoyed within a few days of roasting.
Creating Ideal Flavor Pairings
The Classic Pairing
The most traditional way to serve these is with a big scoop of high-quality vanilla bean ice cream. The heat from the pears melts the ice cream into a sort of "creme anglaise" that mingles with the buttery cinnamon syrup.
If you want something a bit lighter, a dollop of cold mascarpone or Greek yogurt with a drizzle of honey is also a winner.
The Breakfast Upgrade
Believe it or not, these are incredible for breakfast. If you have leftovers, chop them up and stir them into a warm bowl of steel cut oats. The syrup acts as your sweetener, and the pears provide a soft, jammy texture.
You can even serve a half pear alongside some sourdough French toast for a brunch that looks like it came straight out of a bistro.
Stovetop vs. Oven Comparison
| Method | Time | Texture | Best For |
|---|---|---|---|
| Oven Roasting | 35 minutes | Evenly soft, caramelized | Dinner parties and desserts |
| Stovetop Sauté | 15 minutes | Crispy edges, firmer center | Quick snacks or oatmeal topping |
If you want X, do Y
- If you want a thicker syrup, whisk a teaspoon of cornstarch into the lemon juice before coating the pears.
- If you want a deeper color, use dark brown sugar instead of light to increase the molasses content.
- If you want a crunchier topping, add the walnuts in the last 5 minutes of baking to prevent them from over toasting.
Summary of the Method
To get the best results, remember that this recipe is all about the "basting." Don't just set it and forget it. That 20 minute mark is your cue to get involved and move those juices around. That's how you get the glassy, professional finish that makes these pears look like they cost $15 at a fancy restaurant.
Enjoy the process, and don't be afraid to taste the syrup as it develops - just be careful, it's hot!

Recipe FAQs
What type of pear is best for roasting to prevent mushiness?
Bosc or firm Anjou pears are recommended. You need a fruit that is very firm, almost hard, because the roasting process will soften it significantly; soft pears will dissolve.
How do I stop the pears from turning an unappetizing grey color after peeling?
Rub the cut sides immediately with fresh lemon juice. The acid inhibits the enzymes responsible for oxidation, keeping the flesh bright white throughout cooking.
How long should the pears roast at 400°F before basting?
Bake for 20 minutes initially. This allows the butter and sugar to melt thoroughly and start the caramelization process around the edges of the fruit.
Can I make a dairy-free version of the buttery glaze?
Yes, you can substitute the butter with vegan butter or coconut oil. For a creamy texture that mimics the fat content, you might consider looking at techniques similar to our dairy-free Dressing recipe for stable fat incorporation.
Is it necessary to cover the pears with foil during the final stage of baking?
No, covering is generally unnecessary if you baste them. Basting the pears halfway through keeps the tops moist and promotes the syrupy glaze formation without steaming the fruit.
How can I ensure my buttery glaze achieves a thick, glossy finish?
Baste frequently and do not over thin the mixture at the start. Reducing the juices uncovered during the last 15 minutes allows the sugar to concentrate and form that thick, clinging syrup.
How should I store leftovers and reheat them without losing texture?
Store in an airtight container in the refrigerator for up to three days. Reheat them in a 350°F oven for about 10 minutes to restore the glossy glaze, rather than microwaving.
Buttery Roasted Pears Recipe
Ingredients:
Instructions:
Nutrition Facts:
| Calories | 318 kcal |
|---|---|
| Protein | 1.8 g |
| Fat | 16.8 g |
| Carbs | 43.5 g |
| Fiber | 6.8 g |
| Sugar | 32.8 g |
| Sodium | 154 mg |
