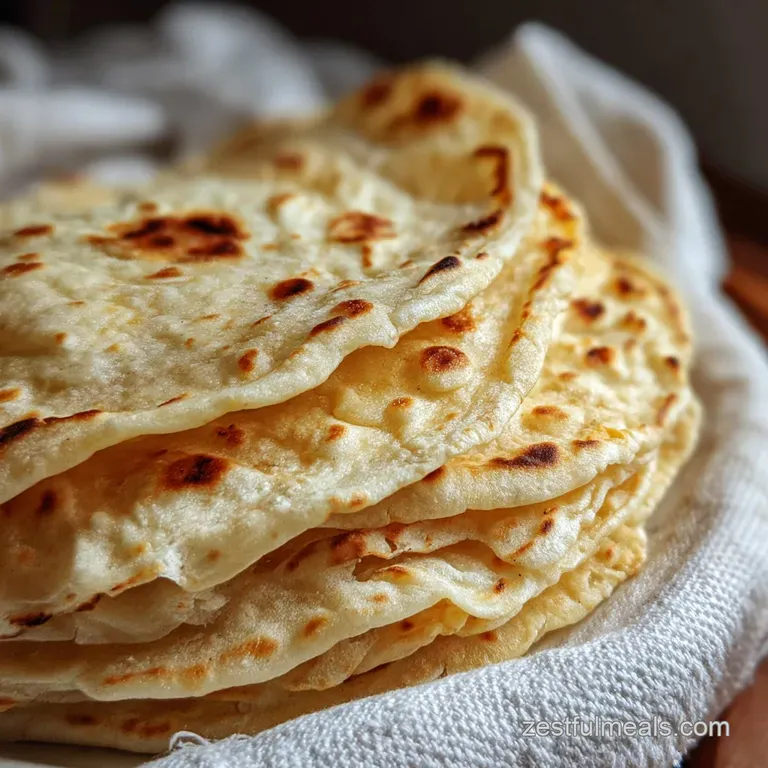
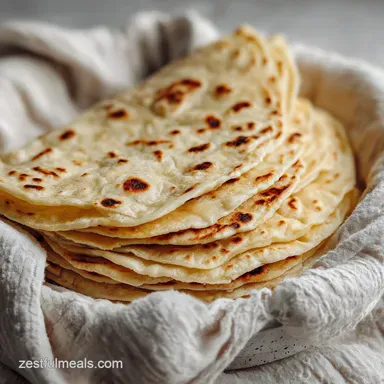
Flour Tortillas: Authentic Homemade Rounds
- Time: Active 45 minutes, Passive 15 minutes, Total 1 hour
- Flavor/Texture Hook: Bubbled, charred, and velvety
- Perfect for: Taco Tuesdays or budget-friendly family dinners
- Master the Softest Homemade Flour Tortillas Every Single Time
- Understanding the Specs for These Handcrafted Wraps
- Gathering Your Essentials for a Traditional Dough
- Setting Up Your Kitchen for Optimal Searing Results
- Mastering the Art of Rolling and Griddle Cooking
- Practical Solutions for Perfecting Your Tortilla Technique
- Creative Ways to Customize and Swap Ingredients
- Keeping Your Leftovers Fresh and Ready to Eat
- Flavor Pairings That Your Family Will Love
- Recipe FAQs
- 📝 Recipe Card
Master the Softest Homemade Flour Tortillas Every Single Time
The first time I tried making these, my kitchen looked like a snow globe had exploded. There was flour on the dog, flour in my hair, and a pile of stiff, cardboard like discs on the counter that could have doubled as frisbees.
But then, that unmistakable smell hit me the nutty, toasted aroma of flour meeting hot fat. I tore off a piece of a warm, bubbled tortilla, and the way it felt like a soft cloud in my hand changed everything.
We didn't even make it to the taco fillings that night; the kids and I just stood over the counter, slathering them in butter and salt.
Since then, I've made thousands of these. I've learned that you don't need fancy equipment or a culinary degree to get that restaurant quality puff. You just need to understand how the dough behaves. This recipe is the backbone of our weeknight routine because it uses pantry staples that cost pennies, yet it makes a standard Tuesday feel like a special occasion. Whether you’re stuffing them with leftovers or using them for a Keto Chili Recipe night where the kids want actual wraps, these are the gold standard.
There’s something deeply satisfying about watching a flat circle of dough hit a dry skillet and suddenly balloon up with air. It’s a small kitchen miracle that happens in seconds. If you’ve been intimidated by dough before, trust me on this: flour tortillas are the most forgiving place to start.
We’re going to walk through the tactile cues what the dough should feel like and how to tell when your pan is at that sweet spot of heat.
Understanding the Specs for These Handcrafted Wraps
The Physics of the Puff
The sudden high heat of the skillet converts the moisture in the dough into steam, which is trapped by layers of fat coated flour. This internal pressure forces the dough to expand instantly, creating those signature translucent bubbles that later become charred toasted spots.
- Fat Saturation: Rubbing the lard or butter into the flour creates tiny waterproof barriers that limit gluten development.
- Thermal Expansion: A hot pan (around 400°F) is non negotiable for the steam to flash boil and lift the dough.
- Gluten Relaxation: Resting the dough allows the coiled protein strands to slacken so the tortilla doesn't shrink back when rolled.
- Moisture Equilibrium: Warm water (110°F) hydrates the starches faster than cold water, leading to a more supple dough.
Chef Tip: Freeze your lard or butter for 10 minutes before rubbing it into the flour; the small, cold bits create more distinct "steam pockets" for a flakier texture.
| Method | Cook Time | Texture | Best For |
|---|---|---|---|
| Cast Iron | 45-60 seconds | Best char and chew | Authentic tacos |
| Non Stick | 60-90 seconds | Uniformly soft | Soft burritos |
| Electric Griddle | 2 minutes | Drier, slightly crisper | Large batches |
Choosing your cooking surface changes the final vibe. I personally swear by a well seasoned cast iron skillet because it holds heat like a beast, ensuring every tortilla gets those beautiful "leopard spots" without drying out the interior.
Gathering Your Essentials for a Traditional Dough
Component Analysis
| Ingredient | Science Role | Pro Secret |
|---|---|---|
| All Purpose Flour | Structure | Use a kitchen scale for 375g to avoid dry, heavy tortillas. |
| Lard or Butter | Tenderness | Lard provides a traditional savory depth; butter adds a creamy note. |
| Warm Water | Hydration | Keep it at 110°F to melt the fat slightly as you mix. |
To get these right, you'll need the following quantities. Please don't eyeball the water; the ratio is everything when you're working with flour.
- 3 cups (375g) all purpose flour: This provides the perfect protein balance for stretch.
- 1 teaspoon (6g) fine sea salt: Essential for bringing out the nutty flavor of the toasted flour.
- 1 teaspoon (4g) baking powder: Our insurance policy for a soft, airy crumb.
- 1/3 cup (75g) lard or unsalted butter: This is what makes them "velvety" rather than "chewy."
- 1 cup (240ml) warm water (110°F/43°C): The catalyst that brings the dough together.
If you are out of lard, don't panic. I often use unsalted butter because it's always in my fridge, and the flavor is spectacular. For a more budget friendly version, vegetable shortening works too, though you'll lose a bit of that rich flavor profile.
Setting Up Your Kitchen for Optimal Searing Results
You don't need a tortilla press for these. In fact, for flour tortillas, a rolling pin is actually better because it allows you to get them much thinner than a press usually can. I've even used a smooth wine bottle in a pinch when we were camping it works!
You will want a large, flat skillet. If you have a comal, that's the dream, but a standard 10 inch or 12 inch cast iron skillet is the workhorse here. Make sure you have a clean kitchen towel nearby. This is a non negotiable tool.
As the tortillas come off the heat, they need to be tucked into a towel "cocoon" to steam. This step is what turns a crispy disc into a soft, pliable wrap.
Another pro tip: get a small bowl of extra flour for your work surface, but use it sparingly. If you incorporate too much extra flour while rolling, the tortillas will become dry and dusty. I like to use a silicone mat if I'm feeling fancy, but a clean countertop is just as good.
Now, let's get into the actual rhythm of the dough.
Mastering the Art of Rolling and Griddle Cooking

1. Integrating the Fat
Whisk your flour, salt, and baking powder in a large bowl. Add your lard or butter. Use your fingertips to rub the fat into the flour until the mixture looks like coarse crumbs with some pea sized bits remaining. Note: This prevents over mixing later.
2. Hydrating and Kneading
Pour in the warm water and stir with a wooden spoon until a shaggy mass forms. Turn it out onto a lightly floured surface and knead for about 3 minutes until the dough is smooth and tacky like a sticky note.
3. Honoring the Rest
Divide the dough into 12 equal portions (about 50-60g each) and roll them into smooth balls. Cover them with a damp cloth and let them rest for at least 15 minutes. Note: This is when the gluten relaxes.
4. Rolling for Translucency
Flatten a dough ball and roll from the center outward, rotating as you go. Roll them until they are thin enough to almost see the grain of the wood through them.
5. Blistering on the Heat
Preheat your skillet over medium high heat. Lay the tortilla flat in the dry pan. Cook for 30-45 seconds until bubbles form and the bottom has golden brown spots.
6. The Steaming Finish
Flip the tortilla and cook for another 20 seconds. The tortilla should puff up like a pillow. Immediately move it to your cloth covered plate and wrap it tightly.
These are fantastic when used for a Breakfast Burritos recipe the next morning. The steam in the towel continues to cook the starch, ensuring they stay soft even after they cool down.
Practical Solutions for Perfecting Your Tortilla Technique
Why Your Tortillas Shrink Back
If you roll the dough and it immediately pulls back like a rubber band, your gluten is too tight. This usually happens because the dough hasn't rested long enough or you were a bit too aggressive with the kneading. Simply cover the dough balls and walk away for another 10 minutes.
Patience is the cheapest ingredient in your kitchen.
Solving the Stiff Disc Problem
If your tortillas come out more like crackers than wraps, they were either cooked too long at too low a temperature, or you didn't wrap them in a towel immediately. High heat is your friend here you want them in and out of the pan in under 90 seconds total.
| Problem | Root Cause | Solution |
|---|---|---|
| Tortillas are tough | Over kneaded or not enough fat | Knead only until smooth; check fat measurements. |
| No bubbles forming | Pan isn't hot enough | Increase heat until a drop of water sizzles instantly. |
| Edges are cracking | Dough is too dry | Add 1 tbsp of water at a time during the initial mix. |
Common Mistakes Checklist
- ✓ Never skip the 15 minute rest; it’s the difference between easy rolling and a workout.
- ✓ Don't use a cold skillet; let it preheat for a full 5 minutes.
- ✓ Keep the finished tortillas wrapped in a cloth; the steam is essential for pliability.
- ✓ Avoid over flouring the board; it makes the exterior "dusty" and dry.
- ✓ Resist the urge to use a press for flour tortillas; rolling gives a better "stretch."
Creative Ways to Customize and Swap Ingredients
You can easily adapt this recipe based on what's in your pantry or your family's dietary needs. While the lard is traditional, I've found that high-quality fats all bring something different to the table.
| Original Ingredient | Substitute | Why It Works |
|---|---|---|
| Lard (1/3 cup) | Coconut Oil (solid, 1/3 cup) | Great vegan option; gives a very subtle sweetness. |
| All Purpose Flour | Whole Wheat Flour (50/50 mix) | Adds fiber and a hearty, nutty flavor to the wrap. |
| Warm Water | Warm Milk | Creates an even softer, "velvety" crumb like a flatbread. |
If you want to scale this up for a big family gathering, it's easy to do. For a double batch (24 tortillas), just double all ingredients. However, when working with larger amounts of dough, I find it's better to cook in batches.
If the dough sits too long after being rolled, it can stick to the counter, so roll and cook as you go if possible. If you need to scale down for just two people, you can halve everything, but honestly, these freeze so well that I always recommend making the full dozen.
Keeping Your Leftovers Fresh and Ready to Eat
Storage Guidelines
Homemade flour tortillas don't have the preservatives that store-bought ones do, so they will dry out faster. Keep them in a zip top bag in the fridge for up to 5 days. For longer storage, these are absolute champions in the freezer.
Place a piece of parchment paper between each tortilla so they don't stick together, then slide the whole stack into a freezer bag. They’ll stay fresh for up to 3 months.
Reheating and Zero Waste
To reheat, avoid the microwave if you can it often makes them gummy. Instead, toss them back onto a hot, dry skillet for 15 seconds per side. If they've gotten a bit stiff, sprinkle a few drops of water on them before heating to "re steam" them.
If you have leftovers that are starting to get a bit old, don't toss them! Cut them into triangles and fry them in a little oil for the best flour tortilla chips you've ever had. You can also brush them with butter and cinnamon sugar, then bake them at 350°F for 10 minutes for a quick dessert.
We call those "buñuelo chips" at our house, and they disappear in seconds.
Flavor Pairings That Your Family Will Love
While these are the "perfect" vessel for any Mexican inspired dish, their neutrality makes them a versatile workhorse for other cuisines too. I've used them as a quick substitute for naan with curry, or even as a wrap for leftover roasted chicken and pesto.
Debunking Tortilla Misconceptions
One common myth is that you need a specialized "tortilla flour." While Masa Harina is required for corn tortillas, standard All Purpose flour is exactly what you want for the flour variety. Another myth is that the dough needs to be cold.
Actually, using warm water is the secret to a soft dough because it helps the fat integrate more evenly and starts the starch gelatinization process early.
Finally,, some people think you need to oil the pan. Please don't! A dry skillet is the key to those beautiful charred spots. Adding oil will fry the tortilla rather than searing it, leading to a greasy, heavy texture rather than the light, airy finish we're looking for.
Once you get the hang of the "roll sear steam" rhythm, you'll never look at a store-bought pack the same way again. Happy cooking, friend!

Recipe FAQs
Can I use all-purpose flour for homemade flour tortillas?
Yes, all-purpose flour is exactly what you want. While Masa Harina is essential for corn tortillas, standard all-purpose flour provides the perfect protein balance for the stretch and tenderness required for flour tortillas.
Why do my homemade flour tortillas shrink back when I roll them?
Your gluten is too tight. This typically means the dough hasn't rested long enough or was kneaded too aggressively; cover the dough balls and let them rest for an additional 10 minutes.
How do I achieve the signature bubbles and char on my flour tortillas?
Cook on a screaming hot, dry skillet. The high heat converts moisture to steam, creating trapped air pockets that cause the puff, while the dry surface allows for direct searing for those desirable charred spots.
Why do my tortillas turn out stiff or cracker like?
They were likely cooked too long at too low a temperature, or not wrapped immediately. Aim for a total cooking time under 90 seconds per tortilla on high heat, and always wrap them in a towel post cook to steam.
Can I substitute lard in this recipe?
Yes, you can substitute other fats like unsalted butter or solid coconut oil. Lard offers a traditional savory depth, butter adds a creamy note, and coconut oil works well for a vegan option, though it may impart a subtle sweetness.
How should I store homemade flour tortillas to keep them fresh?
Refrigerate them in an airtight bag for up to 5 days, or freeze them for up to 3 months. Place parchment paper between each tortilla before freezing to prevent sticking, and avoid microwaving for reheating if possible; a skillet works best.
Is it true you need a special tortilla press for flour tortillas?
No, a rolling pin is actually preferred for flour tortillas. A rolling pin allows you to achieve a much thinner and more even diameter than most tortilla presses, resulting in a softer wrap that holds fillings better.
Homemade Flour Tortillas
Ingredients:
Instructions:
Nutrition Facts:
| Calories | 170 kcal |
|---|---|
| Protein | 3.1 g |
| Fat | 6.6 g |
| Carbs | 23.8 g |
| Fiber | 0.8 g |
| Sugar | 0.1 g |
| Sodium | 225 mg |
