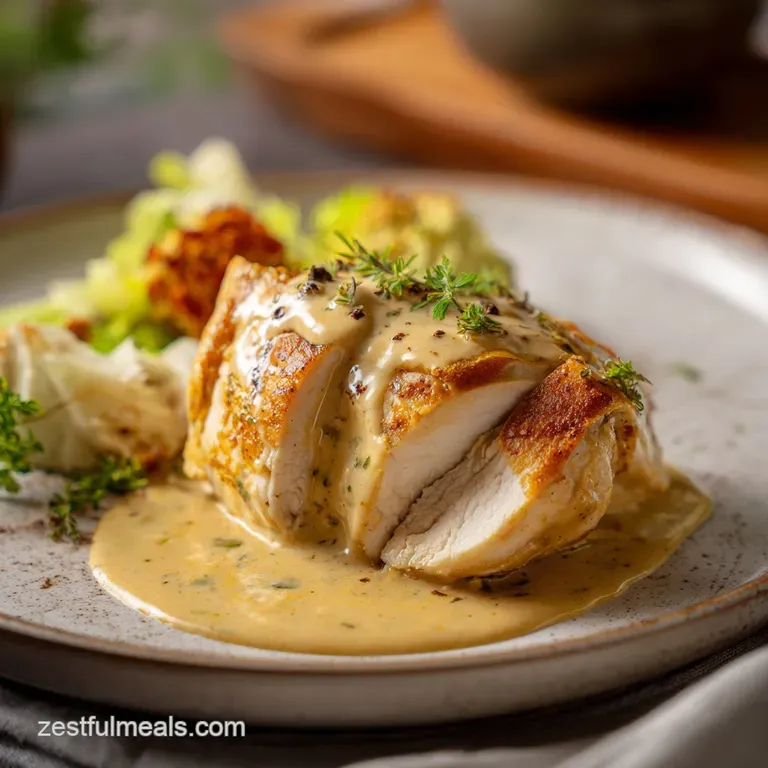
Moist Baked Chicken Breast Recipe

- Time: Active 10 minutes, Passive 22 minutes, Total 32 minutes
- Flavor/Texture Hook: Savory sweet crust with a velvety, succulent center
- Perfect for: Busy weeknights, budget-friendly meal prep, and picky eaters
- How to Achieve the Most Flavorful Baked Chicken Breast
- The Science Behind Keeping Your Meat Juicy and Tender
- Analyzing the Essential Ingredients for Successful Roasting
- Essential Kitchen Tools for a Stress Free Family Dinner
- Step by Step Method for Reaching Culinary Success at Home
- Identifying the Fixes for Common Weeknight Cooking Errors
- Creative Flavor Swaps That Your Entire Family Will Love
- Efficient Ways to Handle Leftovers and Reduce Food Waste
- Final Garnishing Techniques to Make Your Dinner Plate Shine
- Baked Chicken Breast FAQs
- 📝 Recipe Card
How to Achieve the Most Flavorful Baked Chicken Breast
The sound of a timer going off used to fill me with a tiny bit of dread. For years, I struggled with the "cardboard" effect you know exactly what I mean. That moment when you slice into a breast only to find it's tough, stringy, and requires a gallon of water just to swallow.
My kids would stare at their plates, and I’d feel like a failure for serving something so bland.
Everything changed when I stopped treating poultry like a delicate flower and started treating it like a steak. I realized that the secret wasn't more time in the oven, but rather a strategic burst of heat and a specific balance of pantry staples.
This recipe is the result of countless "mistake" dinners turned into a foolproof system that works even when you're rushing between school runs and laundry.
We're going to use a blend of spices that creates a protective barrier, locking those precious juices where they belong. It's simple, it's fast, and it uses basic tools you already have in your kitchen.
No fancy sous vide machines or overnight brines required here just straightforward cooking that respects your time and your wallet.
The Science Behind Keeping Your Meat Juicy and Tender
- The Sugar Shield: Including 1 tsp brown sugar creates a rapid Maillard reaction at 400°F (200°C), forming a thin caramel barrier that prevents internal steam from escaping.
- Protein Denaturation Control: over High heat roasting for exactly 22 minutes tightens the outer muscle fibers quickly to "cage" the moisture before the center can overcook and turn rubbery.
- Capillary Action Recovery: Resting the meat for 5 minutes allows the internal pressure to drop, letting the liquid redistribute back into the fibers instead of spilling onto the cutting board.
Chef's Tip: To get a truly professional result, freeze your salted butter for 10 minutes before slicing it into small cubes. When these cold cubes hit the hot chicken in the final minutes, they create a mini emulsion with the lemon juice that coats the meat rather than just running off.
| Thickness of Breast | Internal Temp | Rest Time | Visual Cue |
|---|---|---|---|
| 0.5 inch (Pounded) | 165°F (74°C) | 3 minutes | Surface is opaque and firm |
| 1.0 inch (Standard) | 165°F (74°C) | 5 minutes | Juices run clear when pierced |
| 1.5 inch (Jumbo) | 165°F (74°C) | 8 minutes | Deep golden exterior crust |
It is vital to understand that the thickness of your meat dictates the physics of the heat transfer. A thicker piece requires a slightly longer rest to ensure the carryover cooking finishes the center without drying the edges. If you find yourself frequently cooking for a crowd, you might want to look at a Slow Cooker Chicken recipe for a more hands off approach during the holidays.
Analyzing the Essential Ingredients for Successful Roasting
| Component | Science Role | Pro Secret |
|---|---|---|
| Sea Salt | Denatures proteins to hold water | Use 1 tsp for every 4 breasts to ensure deep seasoning |
| Olive Oil | Conducts heat and prevents sticking | Pat the meat bone dry first so the oil clings to the skin |
| Smoked Paprika | Adds color and earthy depth | Choose "smoked" over "sweet" for a grilled aroma from the oven |
| Garlic Powder | Provides savory umami base | Fine powder penetrates the fibers better than fresh minced garlic |
The Protein Component
We are using 4 boneless, skinless chicken breasts, ideally around 6-8 oz each. If yours are larger, you'll need to increase the cook time or butterfly them. Why this? Uniform size ensures all pieces finish at the exact same moment.
For the Best Seasoning
The rub consists of 1 tsp smoked paprika, 1 tsp garlic powder, 0.5 tsp onion powder, 1 tsp dried oregano, 1 tsp brown sugar, 1 tsp sea salt, and 0.5 tsp cracked black pepper. Why this? This ratio balances salt, heat, and sweetness for a "universal" flavor.
For the Optional Pan Sauce
2 tbsp salted butter, 1 tbsp fresh lemon juice, and 1 tbsp fresh parsley. Why this? The acidity of the lemon cuts through the fat for a bright finish.
Essential Kitchen Tools for a Stress Free Family Dinner
You don't need a pantry full of gadgets to make this work. A standard 9x13 inch baking dish or a large rimmed baking sheet will do the trick. If you use a glass dish, keep in mind it holds heat longer than metal, so you'll want to remove the chicken immediately after the timer goes off to stop the cooking.
The most important tool in your arsenal is a digital meat thermometer. I used to try the "finger poke" test, but it's notoriously unreliable for poultry. A quick probe ensures you hit that 165°F (74°C) mark perfectly.
You'll also want a small mixing bowl for your spices and a pair of tongs to flip the meat without piercing it prematurely and losing juices.
step-by-step Method for Reaching Culinary Success at Home
Phase 1: Leveling Act
Preheat your oven to 400°F (200°C). Place the 4 boneless, skinless chicken breasts between two sheets of plastic wrap. Use a heavy skillet or meat mallet to gently pound the thickest part of the breast until it is an even thickness.
Note: This prevents the thin "tail" from drying out while the "head" cooks.
Phase 2: Seasoning Shield
Pat the meat completely dry with paper towels. Drizzle 2 tbsp extra virgin olive oil over the breasts. In a small bowl, combine the paprika, garlic powder, onion powder, oregano, brown sugar, salt, and pepper.
Sprinkle the mixture evenly over both sides of the chicken, pressing it in with your fingers until the meat is fully coated.
Phase 3: over High heat Roast
Place the chicken in your baking dish, ensuring they aren't touching. Slide the dish into the center rack of the oven. Bake for 18 minutes until the surface begins to glisten and turn golden.
Phase 4: Internal Check
Open the oven and quickly place a small cube of the 2 tbsp salted butter on top of each breast. Close the door and bake for another 4 minutes until the internal temperature reaches 160°F (71°C).
Note: The temp will rise to 165°F during the rest.
Phase 5: The Recovery
Remove the pan from the oven. Drizzle the 1 tbsp fresh lemon juice over the meat, mixing it with the melted butter in the pan. Transfer the chicken to a warm plate and pour the pan juices over them.
Tent loosely with foil and let them sit for 5 minutes until the fibers relax and reabsorb the liquid.
Phase 6: Final Garnish
Sprinkle the 1 tbsp chopped fresh parsley over the top. Slice against the grain into thick medallions until you see the glistening, moist interior.
Identifying the Fixes for Common Weeknight Cooking Errors
Why Your Meat Feels Rubber
If the texture is "bouncy" or rubbery, it usually means the chicken was cooked too slowly at a low temperature, or it was "woody breast" from the grocery store. High heat is your friend here.
By blasting it at 400°F (200°C), you skip the stage where the meat becomes tough and leathery.
Prevent Oozing White Protein
That white stuff is called albumin. It's totally safe, but it's a sign the meat is being squeezed too hard by contracting muscle fibers. To minimize this, don't cook the chicken straight from the fridge. Let it sit on the counter for 15 minutes to take the chill off before it hits the hot oven.
| Problem | Root Cause | Solution |
|---|---|---|
| Dry edges | Uneven thickness | Pound the breast to an even 1 inch thickness |
| Bland flavor | Seasoning didn't stick | Pat the meat bone dry before applying oil and spices |
| Soggy bottom | Crowded pan | Use a larger dish so air circulates around each piece |
Common Mistakes Checklist
- ✓ Skipping the "dry" step: Moisture on the surface creates steam, not a crust.
- ✓ Forgetting the sugar: That teaspoon of brown sugar is what gives you the color.
- ✓ Slicing too soon: If you cut it immediately, the juice stays on the board, not in the meat.
- ✓ Using "enhanced" chicken: Avoid packs injected with "up to 15% saline solution" for better texture.
- ✓ Relying on color: Always use a thermometer; golden brown doesn't always mean done.
Creative Flavor Swaps That Your Entire Family Will Love
If you’re looking for a different vibe, you can easily pivot this recipe. For a more caramelized, savory sweet profile, you might want to try a Garlic Brown Sugar recipe which leans into those deeper molasses notes.
A Mediterranean Twist
Replace the oregano and paprika with 1 tbsp of Za'atar and 0.5 tsp of dried lemon peel. Serve this with a side of cucumber yogurt sauce and warm pita bread. It's a fresh, bright alternative that feels like a vacation on a plate.
For a Spicy Kick
Add 0.5 tsp of cayenne pepper or 1 tsp of red chili flakes to the spice rub. The brown sugar will still provide a nice balance, but you'll get that back of-the throat warmth that pairs perfectly with a cooling coleslaw or roasted corn.
dairy-free Paleo Swap
| Original Ingredient | Substitute | Why It Works |
|---|---|---|
| Salted Butter | Ghee or Avocado Oil | High smoke point and rich flavor. Note: Ghee adds a nutty aroma similar to butter |
| Brown Sugar | Coconut Sugar | Similar caramelization point. Note: Slightly less sweet with a hint of toasted nut |
If you need to scale this up for a party, it's quite simple. When doubling the recipe for 8 people, use two separate baking sheets rather than crowding one. Crowding will lower the oven temperature and cause the chicken to steam rather than roast, resulting in a pale, unappetizing look.
Efficient Ways to Handle Leftovers and Reduce Food Waste
Storage Guidelines: Once cooled, store your chicken in an airtight container in the fridge for up to 4 days. If you're meal prepping, slice the chicken before storing it; it makes for a much faster assembly of salads or wraps during the work week.
Freezing and Reheating: You can freeze these for up to 3 months. To reheat without drying them out, place the breast in a shallow dish with a splash of chicken broth, cover with a lid, and warm in a 300°F (150°C) oven for 10 minutes.
Avoid the microwave if possible, as it tends to make the protein fibers "snap" and become tough.
Zero Waste Ideas: Don't throw away those pan juices! That mixture of melted butter, lemon, and chicken drippings is liquid gold. Toss it with some cooked pasta or drizzle it over steamed broccoli.
If you have leftover meat that's getting a bit dry, shred it and mix it with a little mayo and celery for the best chicken salad you've ever had.
Final Garnishing Techniques to Make Your Dinner Plate Shine
Visual Appeal Secrets
We eat with our eyes first, especially kids! To make a simple breast look like a restaurant dish, slice it on a bias (at a 45 degree angle). This exposes more of the juicy interior and makes the portion look larger and more "fancy" than a whole slab of meat sitting on the plate.
Pop of Freshness
The fresh parsley isn't just for show. It adds a "green" hit that cuts through the savory spices. If you want to go the extra mile, zest the lemon you used for the juice over the top right before serving. The oils in the zest provide a fragrant aroma that hits the table before the plate even lands. If you're looking for something even more impressive for a Sunday dinner, my Roast Duck Recipe is a fantastic way to practice these same over high heat techniques on a different protein.

Baked Chicken Breast FAQs
Is it better to bake boneless chicken breast at 350 or 400?
400°F (200°C) is generally better for tenderness. Baking at a higher temperature ensures the outside sears quickly, creating a protective crust that seals in internal moisture.
How long should you bake chicken breasts in the oven?
Approximately 20 to 25 minutes for standard 1 inch breasts at 400°F. Always use a thermometer; they are done when they reach an internal temperature of 165°F (74°C).
How long do chicken breasts need in the oven at 400 degrees?
Expect around 22 minutes total baking time at 400°F (200°C). This includes a quick 4-minute final blast after seasoning to ensure that glorious golden crust forms.
How do you cook chicken breast in the oven so it's not dry?
Pound the meat to an even thickness and rest it after baking. Pounding ensures consistent cooking, and resting for 5 minutes allows the internal juices to redistribute rather than spill out when you slice it.
What is the absolute minimum internal temperature for baked chicken breast?
The USDA standard minimum is 165°F (74°C). Remove the chicken from the oven closer to 160°F (71°C) and let it rest, as carryover cooking will bring it safely to temperature.
Can I bake frozen chicken breasts at 400 degrees?
No, avoid baking chicken straight from frozen at high heat. The outside will burn before the center thaws, leading to uneven cooking and guaranteed dryness.
Is brining really necessary to keep chicken breast juicy?
No, brining is optional but highly effective for moisture retention. A dry brine using just salt and sugar 24 hours prior works almost as well as a wet brine by helping the proteins hold onto water. If you enjoy mastering flavor penetration, see how the same initial seasoning concept applies to our Char Siu Chicken recipe.
Moist Baked Chicken Breast
Ingredients:
Instructions:
Nutrition Facts:
| Calories | 357 kcal |
|---|---|
| Protein | 45.8 g |
| Fat | 17.8 g |
| Carbs | 1.5 g |
| Fiber | 0.2 g |
| Sugar | 1.1 g |
| Sodium | 620 mg |
