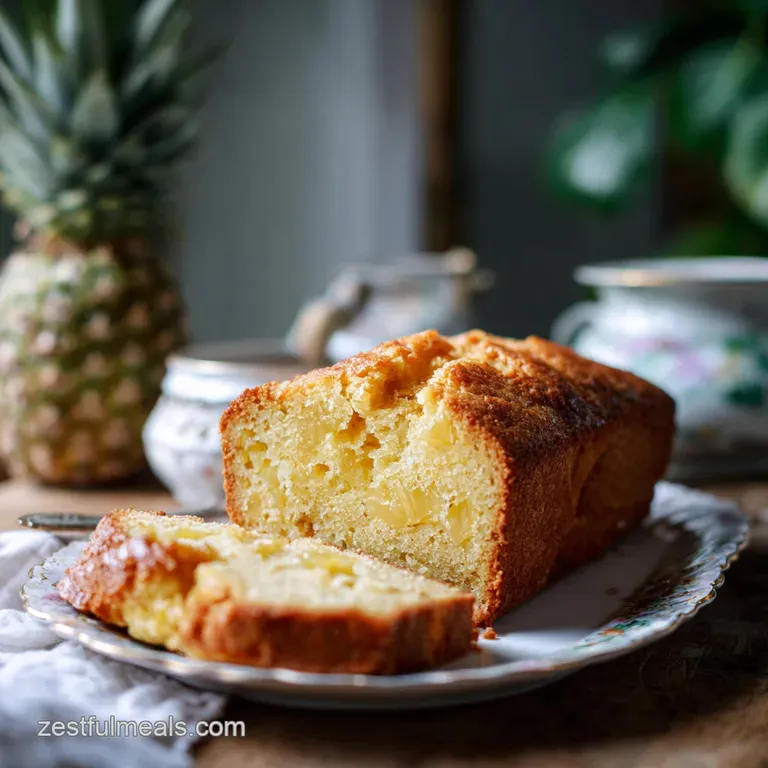
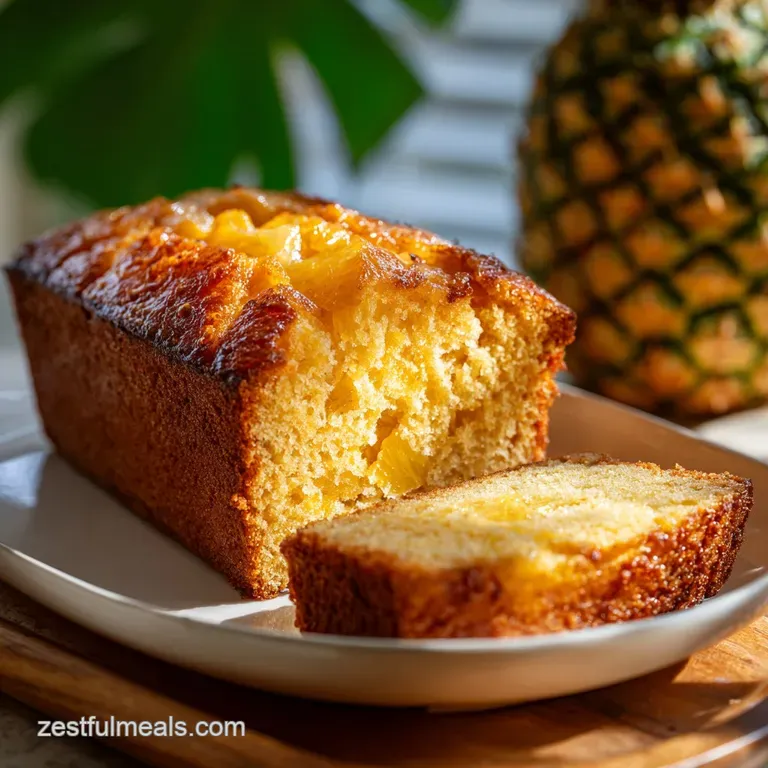
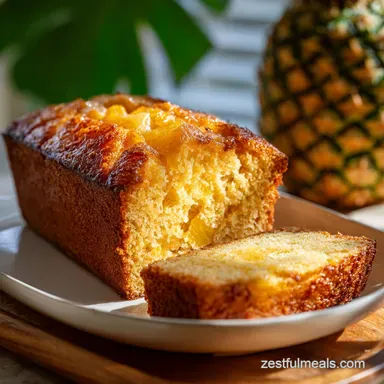
Pineapple Bread: Moist and Tropical
- Time: Active 15 minutes, Passive 60 minutes, Total 75 minutes
- Flavor/Texture Hook: A buttery, tender crumb punctuated by tangy pineapple bursts and a shatter crisp glazed top.
- Perfect for: Lazy weekend brunches, budget-friendly gifting, or a sweet lunchbox treat.
Bake the Moistest Pineapple Bread Ever
Does your kitchen smell like a tropical vacation yet? The first time I tried making a loaf with fruit, it was a literal disaster a heavy, wet brick that refused to bake through in the middle.
I realized I was treating the fruit like an afterthought, but in a solid Pineapple Bread, the fruit is the star and the primary moisture source. When you slide this into the oven, the aroma of caramelizing sugar and warm butter starts to drift through the house within twenty minutes.
It's a scent that makes everyone wander into the kitchen asking, "Is it done yet?"
We've all been there, staring at a can of crushed pineapple in the pantry and wondering if it can actually become something gourmet. Trust me, it can. This recipe is my go to when I want something that feels fancy but costs less than five dollars to put together.
You don't need a fancy stand mixer or imported vanilla beans; you just need a sturdy spatula and the patience to let it cool before you drizzle that glossy glaze over the golden, domed top.
The magic happens in the contrast of textures. You get that slightly crunchy, sugary crust on the outside, but the inside is incredibly soft. I’ve made this for office potlucks and family brunches, and people always assume there’s some secret, expensive ingredient involved.
Honestly, it’s just about respecting the fruit and not overworking the flour. Let's get your oven preheated because your coffee is going to need a slice of this very soon.
The Secret to a Velvety Loaf
Understanding how these basic pantry staples interact is what turned me from a frustrated baker into a confident one. It’s not just about tossing things in a bowl; it’s about how the fats and acids play together.
- Acidity Control: The Greek yogurt provides a hit of acid that reacts with the baking soda, creating tiny carbon dioxide bubbles that lift the heavy fruit.
- Fat Saturation: Using melted butter instead of creamed butter results in a tighter, more "snack cake" like crumb rather than a fluffy birthday cake texture.
- Sugar Hygroscopy: The granulated sugar doesn't just sweeten; it holds onto the pineapple moisture so the bread doesn't dry out even on day three.
- Starch Suspension: Ground ginger acts as a bridge, cutting through the sweetness and highlighting the natural brightness of the fruit.
| Method | Total Time | Texture | Best For |
|---|---|---|---|
| Classic Oven | 75 minutes | Golden, crisp crust | Traditionalists |
| Muffin Tins | 35 minutes | Soft all around | Quick snacking |
| Glass Loaf Pan | 80 minutes | Very dark edges | Those who love "crunch" |
Choosing the right pan and method changes how the heat hits the batter. I personally swear by a metal 9x5 inch pan because it conducts heat more evenly than glass, which helps prevent that dreaded raw middle.
Component Deep Dive
| Ingredient | Science Role | Pro Secret |
|---|---|---|
| Crushed Pineapple | Primary Hydration | Press it until it's almost dry to the touch. |
| Greek Yogurt | Crumb Tenderizer | Use full fat for the most velvety mouthfeel. |
| Baking Soda | Leavening Agent | Ensure it's fresh to get that signature dome. |
Crucial Recipe Details
When we talk about successful baking, timing is everything. You'll spend about 15 minutes of active time whisking and folding, and then the oven does the heavy lifting for 60 minutes. This isn't a recipe you can rush by turning up the heat.
High heat will burn the exterior sugars before the center is set.
We're aiming for exactly 10 thick slices from this loaf. If you slice it while it's hot, the steam escapes too quickly, and the bread can become tough. I know it’s hard to wait, but giving it at least 20 minutes on a wire rack is the difference between a "good" loaf and a "wow" loaf.
Your Basic Shopping List
This is a budget smart recipe, meaning we use what's likely already in your cupboard. If you’re out of something, don't panic. There are ways to pivot without losing that tropical soul.
- 20 oz crushed pineapple: Drained thoroughly. (Note: Reserve 2 tbsp of the juice for your glaze later).
- 0.5 cup unsalted butter: Melted and cooled. Why this? Provides richness and a much better flavor than oil.
- 2 large eggs: Room temperature. (Sub: 0.5 cup unsweetened applesauce for a denser loaf).
- 0.5 cup full fat Greek yogurt: Why this? Adds fat and acidity for a tender crumb. (Sub: Sour cream works perfectly too).
- 0.75 cup granulated sugar: (Sub: Light brown sugar adds a nice molasses undertone).
- 1 tsp vanilla extract: (Sub: Almond extract for a cherry pineapple vibe).
- 2 cups all purpose flour: Spooned and leveled. (Sub: 1:1 gluten-free baking blend).
- 1 tsp baking soda: Our main lifting agent.
- 0.5 tsp baking powder: Backup for extra height.
- 0.5 tsp fine sea salt: To balance the sugar.
- 0.25 tsp ground ginger: Why this? It amplifies the "fresh" taste of canned fruit.
- 1 cup powdered sugar: For the glaze.
- 2 tbsp reserved pineapple juice: To thin the glaze.
If you are feeling adventurous with your baking, you might find that this batter reminds you of a Bread in a Bag in terms of simplicity, though the fruit makes it much heavier and more decadent.
Tools for Success
You don't need much, but having the right basics makes the 15 minutes of prep feel effortless.
- 9x5 inch loaf pan: Metal is preferred for even browning.
- Fine mesh strainer: Absolutely vital for getting the juice out of the pineapple.
- Large mixing bowl: For your wet base.
- Medium mixing bowl: For sifting dry ingredients.
- Rubber spatula: For that "gentle fold" we talk about.
- Parchment paper: Makes lifting the bread out a breeze.
Chef's Tip: If you don't have parchment paper, grease your pan with butter and then "dust" it with granulated sugar instead of flour. It creates a thin, caramelized crust on the edges that is absolutely divine.
step-by-step Method
Follow these steps closely. The order of operations matters because we want to keep the baking soda from reacting too early.
Step 1: The Moisture Purge
Preheat your oven to 350°F (175°C) and line your loaf pan with parchment. Put the 20 oz of crushed pineapple into your strainer. Use a spatula to press down hard you want to see a stream of juice.
Keep pressing until you have about 2 tablespoons of juice saved and the fruit looks like thick pulp.
Step 2: The Emulsion
In your large bowl, whisk the 0.5 cup of melted butter and 0.75 cup sugar together until combined. Add the 2 eggs one at a time, whisking for about 30 seconds after each. Stir in the 0.5 cup Greek yogurt, 1 tsp vanilla, and that pressed pineapple pulp.
Step 3: The Dry Foundation
In your second bowl, sift the 2 cups flour, 1 tsp baking soda, 0.5 tsp baking powder, 0.5 tsp salt, and 0.25 tsp ground ginger. Sifting is key here to avoid clumps of ginger or soda.
Step 4: The Gentle Fold
Gradually dump the dry ingredients into the wet. Use your spatula to cut through the center and fold the batter over. Do this until no streaks of white flour remain. Stop the second it looks mixed! Over mixing develops gluten, which makes the bread tough.
Step 5: The Golden Bake
Pour the batter into the pan and smooth the top. Bake for 60 minutes. At the 45 minute mark, check the color. If it's getting too dark, tent a piece of foil loosely over the top.
Step 6: The Clean Test
Insert a toothpick into the very center at 60 minutes. It should come out clean or with a few moist crumbs. If there is wet batter, give it another 5 minutes.
Step 7: Cooling Phase
Let it sit in the pan for 10 minutes, then lift it out using the parchment edges. Place on a wire rack.
Step 8: The Tropical Glaze
Whisk the 1 cup powdered sugar with your 2 tbsp reserved juice. Drizzle it over the bread while it is slightly warm so it sets into a beautiful, opaque shell.
Fixing Common Baking Flaws
Even the best of us hit a snag sometimes. Most issues with fruit based breads come down to temperature or moisture balance.
Why the middle is gummy
This is almost always due to the pineapple being too wet. If you don't press the juice out, that extra liquid sinks to the bottom and middle, preventing the flour from structure building.
| Problem | Root Cause | Solution |
|---|---|---|
| Soggy Bottom | Too much fruit juice | Press pineapple until it's pulp like. |
| Sunken Center | Underbaked or too much soda | Use a toothpick test; check soda expiry. |
| Burnt Top/Raw Middle | Oven temperature too high | Lower temp to 325°F and bake longer. |
Baking is a game of patience, especially with moist loaves. If you find your oven runs hot, definitely invest in a cheap oven thermometer. It changed my life when I realized my "350" was actually 380!
Common Mistakes Checklist
- ✓ Didn't press the pineapple? You'll end up with a pudding like texture.
- ✓ Over mixed the batter? Expect a rubbery, tough loaf.
- ✓ Used cold eggs? They won't emulsify with the butter properly.
- ✓ Opened the oven door too early? The sudden temp drop can cause the center to collapse.
- ✓ Guessed the flour amount? Always use the "spoon and level" method for accuracy.
Scaling the Recipe
If you want to make two loaves for a bake sale, doubling is easy. Keep the spices at 1.5x instead of 2x to ensure the ginger doesn't overpower the fruit. Bake them on the same middle rack with at least two inches of space between the pans for air circulation.
For mini loaves, reduce the baking time to about 30-35 minutes. These make the best gifts! If you're cutting the recipe in half, beat one egg in a small cup and use half of it. It feels tedious, but using a whole egg for a half recipe will make the bread taste "eggy" and spongy.
| Feature | Fresh Pineapple | Canned (Crushed) |
|---|---|---|
| Prep Time | High (Peeling/Chopping) | Low (Open can) |
| Flavor | Bright/Tart | Consistent/Sweet |
| Moisture | Variable (Risky) | Controlled (Safe) |
Kitchen Myths Debunked
Many people think you have to use fresh pineapple for a "real" bread. In reality, fresh pineapple contains an enzyme called bromelain that can actually break down the proteins in the flour and eggs, leading to a mushy mess.
Canned pineapple is heat treated during the canning process, which deactivates this enzyme, making it the superior choice for baking.
Another myth is that you need to cream the butter and sugar for a long time. While that’s true for fluffy cakes, it’s actually a mistake for a loaf like this. We want a dense, moist snack cake vibe, not a light sponge.
Melting the butter gives us that heavy, luxurious mouthfeel that we crave in a tropical bread.
Safe Storage Guidelines
This bread actually tastes better the next day once the pineapple moisture has redistributed through the crumb.
Fridge Storage: Wrap the cooled loaf tightly in plastic wrap. It will stay fresh for up to 5 days. I recommend toasted a slice and putting a pat of salted butter on it the salt against the pineapple is incredible.
Freezer Storage: You can freeze the whole loaf or individual slices for up to 3 months. Wrap in plastic, then a layer of foil. To reheat, just pop a frozen slice into the toaster or oven at 300°F until warm.
Zero Waste Tip: Don't throw away any leftover juice! If you have more than the 2 tablespoons needed for the glaze, use it to make a Pineapple Tea or add it to a morning smoothie. Even the pineapple "pulp" that gets left in the strainer can be stirred into oatmeal the next morning.
Best Serving Ideas
If you want to turn this into a full dessert, serve a thick slice warm with a scoop of coconut milk ice cream. The heat from the bread melts the cream into a sort of tropical sauce. It’s also surprisingly good when paired with something savory.
I've served this alongside spicy wings or even as a base for a weirdly delicious ham sandwich. If you're looking for a drink to go with it, a Pineapple Upside Down Cocktail creates a double hit of tropical flavor that feels like a total celebration. Whatever you do, don't skip the glaze it provides that necessary "zing" that wakes up the buttery base of the bread.

Recipe FAQs
What is pineapple bread?
Pineapple bread is a dense, moist quick bread that highlights the tropical sweetness of crushed pineapple balanced with a hint of warm ground ginger. It relies on a specific ratio of Greek yogurt and melted butter to achieve a tender crumb structure similar to the texture we perfect in our moist gluten-free carrot cake.
Can I add a can of crushed pineapple to a box cake mix?
No, avoid this substitution. Box cake mixes are chemically balanced for specific liquid-to-dry ratios; adding undrained pineapple will result in a gummy, collapsed mess, while drained pineapple will lack the necessary flavor profile intended for this specific recipe.
Should pineapple bread be refrigerated?
Store at room temperature for up to three days. Because this bread contains fresh fruit, keeping it in an airtight container is essential to maintain moisture without the bread becoming soggy from refrigerator condensation.
Is pineapple good for inflammation of the stomach?
Consult your doctor regarding specific health conditions. While pineapple contains bromelain, this recipe is a baked dessert containing sugar and flour, so it should be enjoyed as a treat rather than a medicinal or anti inflammatory food.
How to ensure the loaf isn't mushy in the middle?
Drain the pineapple thoroughly using a fine mesh strainer. You must press the pineapple with a spatula until no more liquid runs out; failure to remove this excess water is the primary cause of a pudding like, dense center.
How to avoid a rubbery, tough texture?
Fold the batter gently using a rubber spatula. Stop immediately once the flour streaks disappear, as over mixing develops the gluten strands too aggressively and turns a light, cakey loaf into a chewy, dense one.
Is it true I can use cold eggs straight from the fridge?
No, this is a common misconception. You must use room temperature eggs because cold eggs will cause the melted butter to solidify upon contact, preventing a smooth, stable emulsion in the wet mixture.
Moist Pineapple Bread
Ingredients:
Instructions:
Nutrition Facts:
| Calories | 317 kcal |
|---|---|
| Protein | 5.1 g |
| Fat | 11.1 g |
| Carbs | 50.6 g |
| Fiber | 1.2 g |
| Sugar | 31.4 g |
| Sodium | 252 mg |
