Smoked Buffalo Wings: Shatter Crisp Skin
- Time: Active 15 minutes, Passive 2 hours 30 mins, Total 2 hours 45 mins
- Flavor/Texture Hook: Shatter crisp skin with velvety buffalo glaze
- Perfect for: Weekend tailgates, family gatherings, or meal prep
- Master the Ultimate Smoked Buffalo Wings
- Winning With Smoked Buffalo Wings
- Plan Your Smoking Success Timeline
- Analyzing Our Core Flavor Components
- Essential Smoking Gear and Tools
- Step-by-Step Smoking and Searing Guide
- Solving Common Wing Texture Issues
- Adjusting This Recipe for Crowds
- Exploring Bold New Flavor Profiles
- Keeping Your Leftovers Crispy
- The Best Sides to Serve
- Critical Level of Sodium
- Recipe FAQs
- 📝 Recipe Card
Master the Ultimate Smoked Buffalo Wings
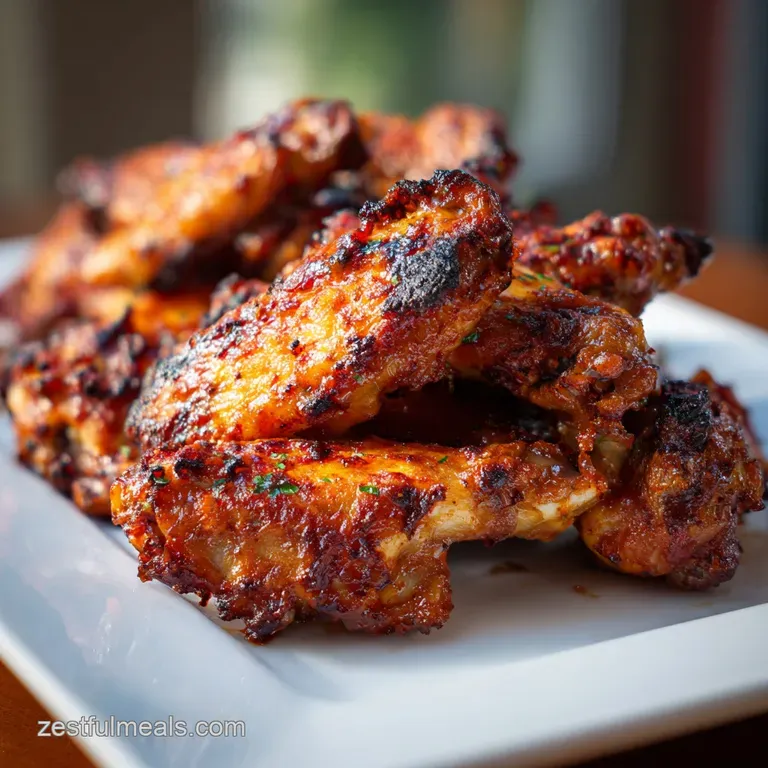
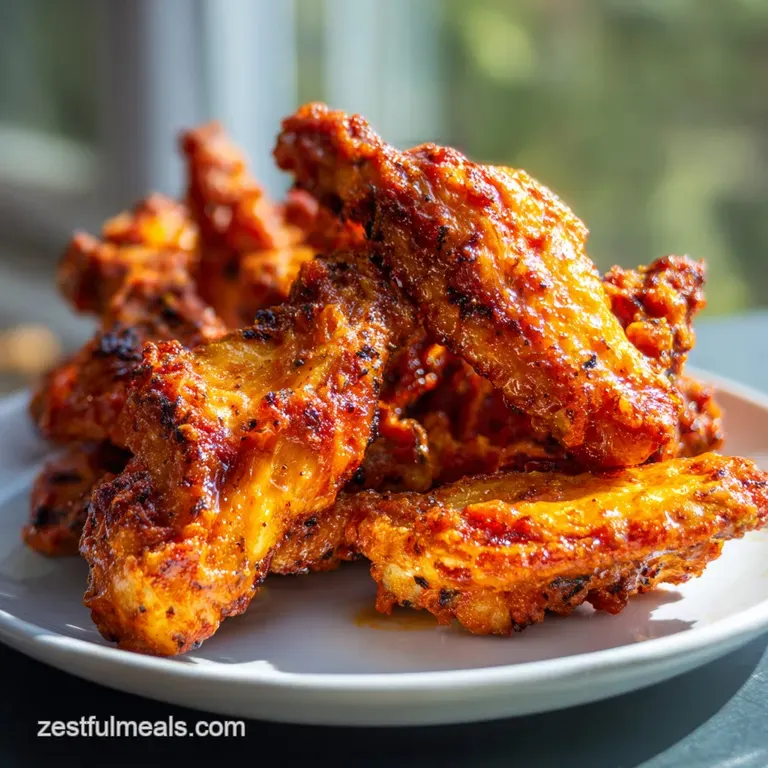
Picture this: it is a brisk Sunday afternoon, the smoker is chuffing away with thin blue hickory smoke, and the smell of rendered chicken fat is swirling through the yard. You pull back the lid and see three pounds of wings glowing with a deep mahogany hue, the skin looking tight and ready to snap.
That first bite gives you that audible shatter crisp sound, followed immediately by the punchy, vinegary heat of a butter rich buffalo sauce.
I have spent years trying to get wings right on the pellet grill. For a long time, I ended up with "leathery" skin because I didn't understand how moisture and temperature work together. My kids used to call them "chewy wings," which is the last thing any home cook wants to hear.
After a lot of trial and error, I found the secret lies in a tiny bit of chemistry and a two stage cooking process that works every single time.
This isn't just about throwing meat on a grate it is about controlling the environment so the fat renders out and the skin dehydrates. We are aiming for that restaurant style crunch while keeping the meat inside juicy enough to pull clean off the bone.
Right then, let's get into the details so you can serve up a batch that will have everyone asking for your secret rub.
Winning With Smoked Buffalo Wings
This method is built on the concept of moisture management. Most people take wings straight from the package and put them on the heat, which is a recipe for rubbery results. By following this plan, we use air and heat to our advantage. If you want a similar crunch but don't have the smoker out, our Baked Chicken Wings recipe uses a comparable drying technique that is just as effective in a standard oven.
Science: Harnessing Alkaline Surface Chemistry Baking powder raises the pH levels on the chicken skin, breaking down peptide bonds and allowing the surface to brown and crisp much faster.
This alkaline environment creates micro textures that catch the heat, resulting in a skin that shatters rather than stretches.
- Maillard Acceleration: The elevated pH encourages the proteins and sugars to react quickly, creating that deep golden color.
- Subcutaneous Rendering: The low and slow start allows the fat under the skin to melt slowly without burning the exterior.
- Convection Dehydration: Keeping the wings on a rack ensures airflow hits 360 degrees of the bird, preventing soggy "wet spots."
- Carryover Precision: Pulling wings at exactly 165°F (74°C) ensures the flats don't turn into dry wood.
| Method | Time | Texture | Best For |
|---|---|---|---|
| Low Slow Smoke | 1 hours 15 mins | Soft, very smoky | Maximum flavor infusion |
| Two Stage (This Recipe) | 1 hours 30 mins | Shatter crisp skin | The gold standard for wings |
| over High heat Only | 45 minutes | Crispy but less smoke | Quick weeknight dinners |
Using a two stage method is honestly the only way to get that authentic buffalo feel. It takes a little more patience, but the difference in texture is night and day compared to a single temp cook.
Plan Your Smoking Success Timeline
To keep things stress free, I like to break the afternoon into three clear phases. This prevents that frantic rush when the game is about to start and your sauce isn't even started yet. Trust me, having the wings dry brining in the fridge while you prep the smoker makes the whole process feel like a breeze.
1. The Preparation Phase
First, we focus on the 3 lbs chicken wings. You want to pat them bone dry with paper towels this is non negotiable. Spend 15 minutes mixing your 1 tbsp baking powder, 1 tbsp kosher salt, and spices.
Once they are coated, they need at least 1 hour of "fridge time" on a wire rack to let that alkaline magic happen.
2. The Smoking Phase
Set your pellet grill (like a Traeger or Pit Boss) to 225°F (110°C). This is where the wood flavor penetrates the meat. You’ll let them cruise for about 45 to 60 minutes.
You aren't looking for crispiness yet; you are looking for that beautiful smoky color and an internal temperature around 145°F (63°C).
3. The Finish Phase
Crump the heat up to 425°F (220°C) for the final 20 to 30 minutes. This is when you'll hear the sizzle. While they crisp up, melt your 1/3 cup unsalted butter and whisk it into the 1/2 cup Frank’s RedHot with the Worcestershire sauce.
When the wings hit 165°F (74°C) and look golden brown, toss them in that velvety glaze and serve immediately.
Analyzing Our Core Flavor Components
Choosing the right ingredients is the difference between a "fine" wing and a "where did you buy these?" wing. We aren't using anything fancy here most of this is already in your pantry. The key is how these simple elements interact under the hood of your smoker.
| Ingredient | Science Role | Pro Secret |
|---|---|---|
| Baking Powder | pH Adjuster | Use aluminum free to avoid a metallic aftertaste |
| Frank's RedHot | Acidic Base | The vinegar cuts through the heavy fat of the skin |
| Cold Butter | Emulsifier | Adding cold cubes to hot sauce creates a thicker glaze |
| Kosher Salt | Moisture Drawer | Coarse grains pull surface moisture out more effectively |
Using cold, cubed butter instead of melted butter is a trick I learned from a chef friend. It creates a much more velvety sauce that actually clings to the wings instead of just pooling at the bottom of the bowl.
For the Smoky Dry Rub
The rub is all about balance. We use 1 tsp garlic powder and 1 tsp smoked paprika to complement the actual wood smoke. Since we are using 1 tbsp kosher salt for the 3 lbs of wings, don't be tempted to add more salt later; the buffalo sauce has plenty of sodium to finish the job.
Signature Tangy Buffalo Sauce
Our sauce uses 1/2 cup Frank’s RedHot as the spine, but the 1 tbsp Worcestershire sauce is the secret "umami" booster. It adds a depth that makes the buffalo flavor feel more complex without being overwhelming. If you want a different profile, you could easily swap this for a Honey Lemon Pepper Wings recipe glaze for a sweeter, zesty finish.
Essential Smoking Gear and Tools
You don't need a professional kitchen, but a few specific tools make this recipe a lot easier to manage. A wire cooling rack is probably the most important piece of equipment here. It allows the air in the fridge and the smoke in the grill to circulate under the wings, which prevents the bottom side from getting soggy.
Chef Tip: If you're using a pellet grill, avoid using "alder" wood for wings. It's too light. Go for hickory or a "competition blend" to ensure that smoke flavor actually stands up to the bold buffalo sauce.
You'll also need a reliable instant read thermometer. Wings are small, and they can go from juicy to overcooked in a matter of minutes. I also recommend a large stainless steel bowl for tossing. Plastic bowls can sometimes absorb the orange tint of the buffalo sauce, which is a pain to scrub out later.
step-by-step Smoking and Searing Guide
Let's get cooking. Follow these steps exactly, and you'll have the best wings of your life. Don't skip the drying step it is the most frequent mistake people make.
- Dry the meat. Pat 3 lbs chicken wings with paper towels until no moisture remains on the surface. Note: Surface moisture creates steam, which leads to rubbery skin.
- Mix the coating. Combine 1 tbsp baking powder, 1 tbsp kosher salt, 1 tsp garlic powder, 1 tsp smoked paprika, and 1/2 tsp black pepper in a small bowl.
- Season thoroughly. Toss the wings in a large bowl with the dry rub until every crevice is evenly coated.
- Air dry. Place wings on a wire rack over a baking sheet and refrigerate for 1 hour 15 mins. Note: This dehydrates the skin for a better crunch later.
- Preheat smoker. Set your grill to 225°F (110°C) using your favorite hardwood pellets.
- Smoke. Arrange wings on the grill grates and smoke for 45 minutes until they turn a light mahogany color.
- Crank the heat. Increase the grill temperature to 425°F (220°C). Note: This over high heat finish renders the remaining fat and crisps the skin.
- Cook to temp. Continue grilling for 20-30 minutes until the internal temperature reaches 165°F (74°C).
- Prepare the glaze. In a small saucepan, simmer 1/2 cup Frank’s RedHot, 1 tbsp Worcestershire, 1/2 tsp garlic powder, and 1/4 tsp cayenne. Whisk in 1/3 cup cold butter cubes one at a time.
- Toss and serve. Place hot wings in a clean bowl, pour the sauce over, and toss until the wings are fully submerged and glossy.
| Original Ingredient | Substitute | Why It Works |
|---|---|---|
| Frank’s RedHot | Louisiana Hot Sauce | Similar vinegar forward profile but slightly saltier |
| Baking Powder | Cornstarch | Helps with crisping, though lacks the pH shifting power |
| Unsalted Butter | Ghee | Higher smoke point and rich flavor, though less creamy |
If you use cornstarch instead of baking powder, just know you won't get those tiny little "bubbles" on the skin that characterize a true smoked buffalo wing. It still works, but it's more of a smooth crisp than a textured shatter.
Solving Common Wing Texture Issues
The most frustrating part of smoking wings is when they look great but feel like leather. This usually happens because the fat didn't render or the skin didn't dry out enough. If your wings aren't "snapping" when you bite them, we need to look at your temperature control.
Avoiding Rubbery Skin
If the skin is chewy, your grill likely wasn't hot enough during the finish phase. The 425°F (220°C) jump is essential. Without that blast of heat, the skin just smokes and toughens up.
Also, check your baking powder if it is old, it won't react properly with the chicken proteins.
Preventing Dry Meat
The flats (the two bone pieces) cook faster than the drumettes. If you find the flats are getting dry, try to place them in a cooler part of your smoker while the drumettes sit closer to the heat source.
Pulling them at exactly 165°F (74°C) is the best way to ensure they stay juicy.
| Problem | Root Cause | Solution |
|---|---|---|
| Skin is tough/chewy | Low finishing heat | Ensure grill reaches 425°F (220°C) for the final sear |
| Metallic flavor | Aluminum in powder | Always use aluminum free baking powder |
| Sauce is breaking | Butter added too fast | Whisk in cold butter slowly over low heat |
Common Mistakes Checklist:
- ✓ Skipping the paper towel pat down (leads to steaming)
- ✓ Using baking soda instead of baking powder (will taste terrible)
- ✓ Overcrowding the grill (prevents airflow and even crisping)
- ✓ Forgetting to whisk the sauce (fat and vinegar will separate)
- ✓ Not letting the wings air dry in the fridge for at least an hour
Adjusting This Recipe for Crowds
Scaling wings is fairly straightforward because they are individual units. However, you have to be careful with your smoker's real estate. If you double the recipe to 6 lbs, you might need to work in batches during the over high heat finish to ensure every wing gets direct airflow.
When scaling up, don't just double the salt and spices linearly. For 6 lbs of wings, use 1.5x the salt (1.5 tbsp) to avoid over seasoning, but you can safely double the baking powder and paprika. The sauce can be doubled exactly as written: 1 cup Frank's and 2/3 cup butter.
For smaller batches (like 1.5 lbs), use a small toaster oven for the air drying and finishing steps to save energy. You can still smoke them on the big grill, then move them to a smaller over high heat environment to finish them off.
Exploring Bold New Flavor Profiles
Once you master the base technique, you can start playing with the flavors. The smoke provides such a solid foundation that almost any sauce will work. I often make a half batch of buffalo and a half batch of something experimental for my family.
Honey Habanero Twist
Add 2 tbsp of honey and 1 tsp of habanero mash to the finished buffalo sauce. This creates a "sweet heat" profile that is incredible with the hickory smoke. It’s a bit stickier than the standard version, so be prepared for extra napkins.
Lemon Pepper Buffalo Hybrid
After tossing the wings in the buffalo sauce, hit them with a heavy dusting of lemon pepper seasoning. It adds a zesty, bright top note that cuts through the rich butter. It’s a flavor profile often found in Atlanta style wing spots and it is a total crowd pleaser.
Keeping Your Leftovers Crispy
If you have leftovers (which rarely happens at my house), do not put them in the microwave. The microwave will turn that beautiful crispy skin into a soggy, limp mess. Instead, store them in an airtight container in the fridge for up to 3 days.
You can also freeze them for up to 2 months, though the texture will suffer slightly upon thawing.
To reheat, put them back on a wire rack in a 400°F (200°C) oven or air fryer for 5-8 minutes. This will re render the butter in the sauce and crisp the skin back up. It’s almost as good as the first time around!
For zero waste, take the leftover bones and wing tips and simmer them with some celery and onion to make a smoky chicken stock. It makes an incredible base for a spicy chicken noodle soup or a Beef Barley Soup recipe if you want to mix your proteins for a deeper flavor.
The Best Sides to Serve
You can't have Smoked Buffalo Wings without the classics. I always go with cold celery sticks and a heavy duty blue cheese dressing. The crunch of the celery and the creaminess of the dressing provide the perfect contrast to the spicy, smoky chicken.
If you're looking for something heartier, these wings are incredible alongside a cold potato salad or even a warm Broccoli Casserole recipe for a full "comfort food" spread. The richness of the cheese in a casserole balances the vinegary punch of the Frank's sauce beautifully.
Whatever you choose, just make sure you have plenty of wet wipes on hand. Part of the joy of eating these wings is getting a little messy. It’s proof that you did the sauce right! Enjoy the cook, and let me know how that first shatter crisp bite turns out for you.

Critical Level of Sodium
1980 mg mg of sodium per serving (86% of daily value)
The American Heart Association recommends limiting sodium intake to about 2,300mg per day for overall cardiovascular health.
Sodium Reduction Tips for Your Chicken Wings Recipe
-
Reduce Added Salt-25%
This recipe uses 1 tablespoon of kosher salt. Reduce the amount of salt by half, or eliminate it altogether. Taste and adjust other seasonings as needed. You can always add more, but can't remove it!
-
Make Your Own Hot Sauce-20%
Pre-made hot sauces like Frank's RedHot can contain a significant amount of sodium. Consider making your own with fresh peppers, vinegar, and spices to control the sodium content. Or look for a lower sodium version in your local grocery store.
-
Low-Sodium Worcestershire-15%
Worcestershire sauce contributes to the sodium content. Look for a low-sodium version, or use a smaller amount, adding other flavors to compensate, like a dash of balsamic vinegar.
-
Unsalted Butter Only-10%
Make sure you are using unsalted butter as instructed in the recipe. This helps avoid adding any additional sodium to the dish. Consider using a smaller amount or substituting part of it with olive oil for a healthier option.
-
Enhance Flavor with Herbs
Instead of relying on salt for flavor, experiment with fresh or dried herbs and spices like oregano, thyme, rosemary, or chili powder. These additions can boost the taste without adding sodium.
-
Rinse Your Chicken-5%
Rinse the chicken wings under cold water before preparation. This can help remove some surface sodium that may be present from processing.
Recipe FAQs
Can you smoke buffalo wings?
Yes, absolutely, it's highly recommended. Smoking infuses deep wood flavor into the meat before the buffalo sauce is applied, providing complexity that grilling alone cannot match.
How long do you smoke wings at 225?
Smoke for 45 to 60 minutes at 225°F (110°C). This initial low-and-slow phase is crucial for rendering fat and absorbing smoke flavor; aim for an internal temperature around 145°F (63°C) before increasing heat.
How to get crispy skin when smoking wings?
Use a two-stage cooking process and dry brine the wings. After the initial low smoke, increase the grill temperature dramatically to 425°F (220°C) for the final 20-30 minutes to blast the surface dry and crisp the skin.
How long do you smoke chicken wings on a Traeger?
Plan for about 75 to 90 minutes total cooking time, split into two temperatures. Smoke at 225°F (110°C) until 145°F (63°C), then finish at 425°F (220°C) until they reach 165°F (74°C).
Is it true that baking soda is required for crispy smoked wings?
No, this is a common misconception; use baking powder instead of baking soda. Baking powder raises the skin's pH level higher than soda, which actively breaks down proteins to achieve that shatteringly crisp texture.
Should I brine smoked wings?
Yes, an alkaline dry brine using baking powder is highly effective. You should pat the wings dry, apply the rub including baking powder, and then let them air dry uncovered in the refrigerator for at least one hour.
What is the secret to a perfect buffalo sauce glaze?
Whisk in cold butter cubes slowly to the hot sauce base. This creates a stable emulsion that clings to the hot wings instead of separating into oily pools at the bottom of the bowl.
Smoked Buffalo Wings Recipe

Ingredients:
Instructions:
Nutrition Facts:
| Calories | 628 calories |
|---|---|
| Protein | 48 g |
| Fat | 47 g |
| Carbs | 2 g |
| Fiber | 0.5 g |
| Sugar | 0.8 g |
| Sodium | 1980 mg |
