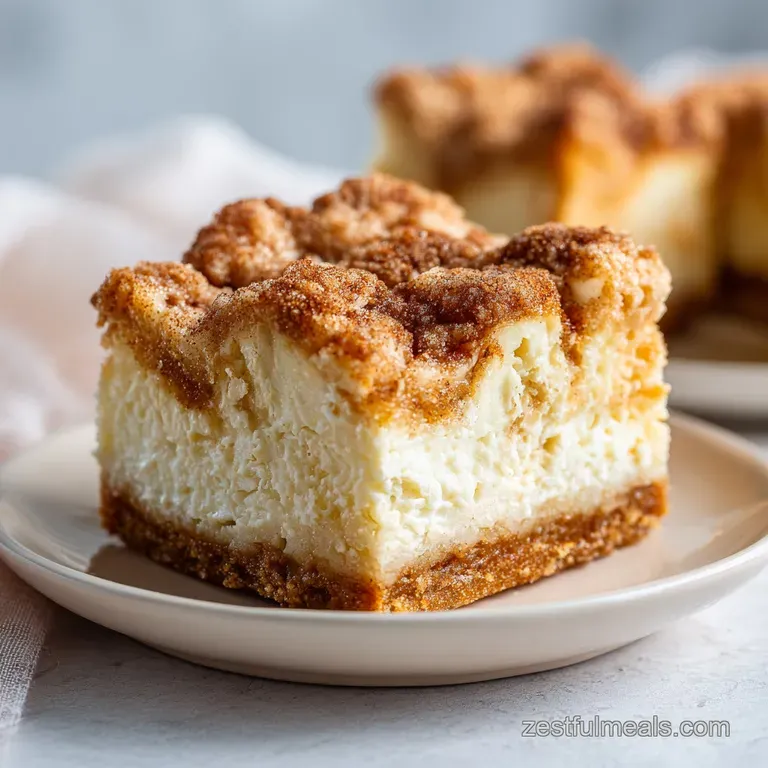
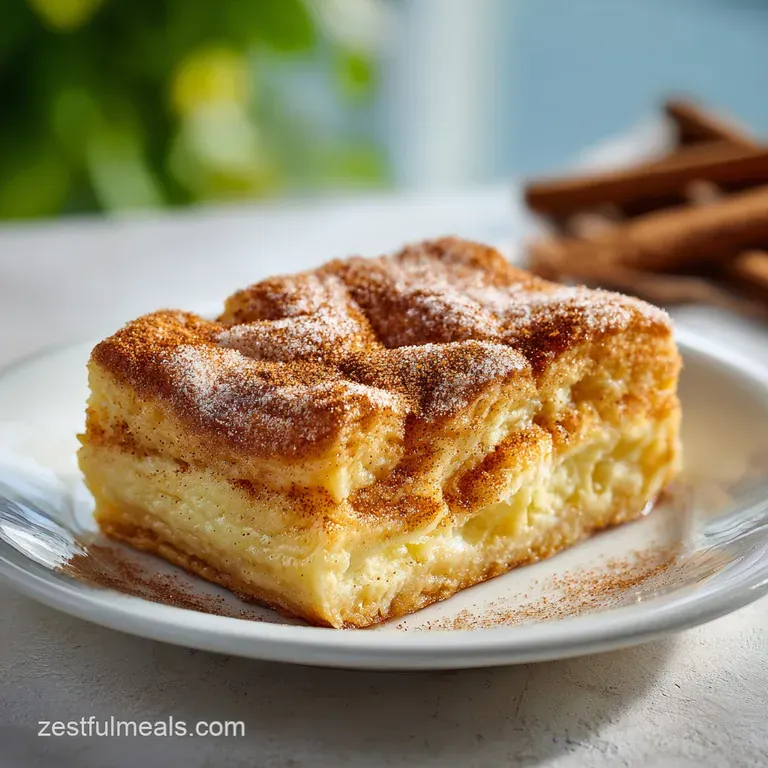
Churro Cheesecake Bars: Silky and Crunchy
- Time: Active 15 minutes, Passive 30 minutes, Total 45 minutes
- Flavor/Texture Hook: Flaky, cinnamon sugar crunch with a silky cream cheese filling
- Perfect for: Potlucks, budget-friendly entertaining, and beginner bakers
- Why This Recipe Works So Well
- Component Analysis for the Perfect Bake
- High Impact Ingredients for Your Next Bake
- Kitchen Tools That Simplify Your Baking
- Detailed Steps for a Flawless Result
- Fixing Common Problems Before They Start
- Budget Friendly Swaps and Tasty Twists
- Myths About Cheesecake Bars
- Practical Storage and Reducing Food Waste
- Serving Suggestions to Impress Your Guests
- Recipe FAQs
- 📝 Recipe Card
The first time I pulled a tray of these out of the oven, the smell of toasted cinnamon and bubbling butter filled my entire kitchen. It was that specific, warm aroma that reminds you of a street fair or a late night stop at a bakery in Mexico.
I remember watching the sugar on top crackle and turn into a dark amber crust while the house stayed quiet. When I finally cut into it, the sound was a distinct shatter—the kind of crunch that tells you exactly how much butter went into those layers.
As a self taught baker, I used to think that "real" desserts had to take hours. I’d spent whole afternoons failing at puff pastry, only to end up with a soggy mess. But then I tried this shortcut. It’s one of those recipes that feels like a cheat code.
You’re using humble ingredients from the grocery store, but because of the way the heat hits the cinnamon sugar against the dough, it transforms into something that looks and tastes expensive. We aren't just making a snack; we are building layers of texture.
What I love most about these bars is how they solve the "boring cheesecake" problem. Traditional cheesecake is great, but it can be one note. By wrapping that creamy center in a spiced, flaky crust, you get a bite that’s exciting from start to finish. It’s also incredibly forgiving.
If you’ve ever worried about your cheesecake cracking or your pastry not rising, this is the recipe that will build your confidence. Let’s get into the specifics of why this works so well.
Why This Recipe Works So Well
- Steam Management: The cream cheese filling acts as a moisture barrier, allowing the bottom crescent sheet to fry in the butter while the top sheet puffs up with trapped steam.
- Sugar Caramelization: As the sugar melts into the melted butter, it creates a "brittle" effect on the surface that stays crispy even after cooling.
- Fat Stabilization: Using a room temperature egg ensures the cheesecake filling doesn't break or curdle when hitting the hot oven air.
- Acid Balance: The slight tang of the cream cheese cuts through the heavy sweetness of the cinnamon coating, preventing the bars from feeling cloying.
| Texture Target | Bake Time | Oven Rack Position | Visual Cue |
|---|---|---|---|
| Soft & Chewy | 28 minutes | Middle | Pale gold with bubbling edges |
| Standard Crisp | 30 minutes | Middle | Deep honey brown and firm center |
| Extra Crunchy | 32 minutes | Upper Third | Dark amber with visible sugar crystals |
Choosing the right bake time is the first step in making this recipe your own. If you prefer a center that is almost gooey, like a warm sopapilla, aim for the 28 minute mark. However, if you want a bar that you can pick up with your hands without it sagging, let it go the full 30 minutes.
I usually find that the middle rack provides the most even heat distribution, which is key for making sure the bottom dough actually cooks through.
Component Analysis for the Perfect Bake
Understanding your ingredients is the best way to stop a recipe from failing before you even turn on the oven. We are using a few shortcut items here, but the way we treat them makes all the difference.
For example, if you use cold cream cheese, you’ll end up with lumps that never quite go away, no matter how much you whisk.
| Ingredient | Science Role | Pro Secret |
|---|---|---|
| Crescent Dough | Provides leavening and flaky structural layers | Keep it chilled until the very second you need to unroll it. |
| Full fat Cream Cheese | Adds density, moisture, and the signature "velvety" mouthfeel | Beat it alone first for 2 minutes to incorporate micro air bubbles. |
| Ceylon Cinnamon | Provides the warm, floral aroma without being bitter | Use fresh spice; cinnamon loses its "kick" after six months in the cabinet. |
The choice of almond extract is something I learned from a local bakery. While vanilla is the backbone, that tiny half teaspoon of almond extract makes the cream cheese taste "fancier." It rounds out the sweetness and gives it a professional edge that people can't quite put their finger on.
It’s a small budget swap that delivers a huge return on flavor.
High Impact Ingredients for Your Next Bake
When you’re shopping for your Churro Cheesecake Bars, quality doesn’t always mean the most expensive brand, but it does mean choosing the right type of ingredient. For instance, the crescent dough is our "shortcut" puff pastry.
I’ve tried the generic store brands, and while they work, the name brands usually have a higher fat content which leads to a more pronounced "shatter" in the crust.
- Pillsbury Crescent Dough Sheets (2 cans): Using the "sheets" instead of the perforated rolls saves you the trouble of pinching seams together. If you can only find the rolls, just make sure to press the perforations closed tightly so the cheesecake doesn't leak through.
- Full fat Cream Cheese (452g): Do not even think about using low-fat or "whipped" cream cheese here. We need the fat for stability and the specific "silky" texture.
- Granulated Sugar (200g total): We split this between the filling and the coating. The sugar in the filling helps the egg set, while the sugar on the outside provides the crunch.
- Unsalted Butter (56g): We melt this to act as the "glue" for our cinnamon sugar. Using unsalted allows us to control the flavor perfectly.
- Large Egg (1): This is our binder. Make sure it's at room temperature so it emulsifies into the cream cheese smoothly.
- Ceylon Cinnamon (2 tbsp): This is milder and sweeter than Cassia cinnamon. It’s what gives authentic Mexican desserts their specific profile.
- Vanilla and Almond Extract: These are our aromatics. The almond extract is the "secret" that makes these taste like they came from a high end shop.
If you find yourself missing an ingredient, don't panic. This recipe is built on flexibility. Below is a table of swaps I've tested that keep the integrity of the dish while helping you save a trip to the store.
| Original Ingredient | Substitute | Why It Works |
|---|---|---|
| Crescent Dough | Puff Pastry Sheets | Higher fat content; results in a much puffier, lighter bar. |
| Granulated Sugar | Light Brown Sugar | Adds a caramel/molasses note. Note: Top will be softer. |
| Almond Extract | Lemon Zest | Provides a bright, citrusy lift that complements the cream cheese. |
A quick note on the cream cheese: if you're in a pinch, you can use the block style store brand, but I've found that some generic brands have a higher water content. If you see liquid in the bottom of the foil wrapper, pat the block dry with a paper towel before mixing.
Excess water is the enemy of a firm cheesecake bar.
Kitchen Tools That Simplify Your Baking
You don't need a professional kitchen to make these, but a few specific tools will make your life much easier. I’ve made these with just a fork and a bowl before, but the texture is always better when you use a bit of mechanical help.
- 9x13-inch Baking Pan: This is the standard size. If you use a glass pan, the edges might get crunchier faster, so keep an eye on it.
- Hand Mixer or Stand Mixer: This is crucial for getting that "velvety" filling. You want to beat the cream cheese until it’s completely smooth before adding anything else.
- Small Pastry Brush: This helps you get an even layer of melted butter on the dough. If you don't have one, the back of a spoon works, but it's a bit messier.
- Offset Spatula: This is the best tool for spreading the cheesecake filling. Since the crescent dough is delicate, a heavy spoon can sometimes tear it.
I once tried to make these at a friend's house without a mixer. It took about 15 minutes of vigorous whisking to get the lumps out of the cream cheese, and my arm was dead by the end. If you’re serious about your baking, a basic hand mixer is the best $20 you’ll ever spend.
It incorporates just enough air to keep the bars light without making them "foamy."
Detailed Steps for a Flawless Result
- Heat things up. Preheat your oven to 180°C (350°F). While it's heating, melt your butter in a small bowl. Note: A warm oven ensures the dough starts puffing immediately.
- Prep the pan. Brush exactly half of your melted butter onto the bottom of the 9x13 pan. Use your pastry brush to get into the corners so nothing sticks.
- Create the floor. Mix your 100g of sugar with the cinnamon. Sprinkle half of this mixture over the buttered pan. It will look like a lot, but this is your bottom crust.
- Lay the base. Unroll one can of crescent dough. Carefully lay it over the cinnamon sugar and press it gently into the edges. Don't stretch it too thin or it will tear.
- Cream the cheese. In a medium bowl, beat your softened cream cheese and the remaining 100g of sugar. Beat for about 2 minutes until it looks like smooth frosting.
- Emulsify the filling. Add the egg, vanilla, and almond extract. Mix on low speed just until the yellow of the egg disappears. Note: Overmixing here adds too much air, which causes the bars to sink later.
- Spread the love. Pour the filling over the bottom dough. Use your spatula to push it to the edges. Try to keep the layer as even as possible for consistent baking.
- The top layer. Unroll the second can of dough and lay it over the filling. It’s okay if it doesn't perfectly reach the edges; it will expand as it bakes.
- The golden finish. Brush the remaining butter over the top dough. Sprinkle the rest of the cinnamon sugar over the butter. Bake for 28–32 minutes until the top is golden and crackling.
- The hardest part. Let the pan cool on a wire rack for at least 30 minutes before moving it to the fridge. They need to set completely to get that clean slice.
Chef's Tip: To get those perfectly square, "Instagram ready" edges, chill the bars in the fridge for at least 3 hours before slicing. Use a large knife dipped in hot water and wiped dry between every single cut. This prevents the cream cheese from dragging and smearing.
Fixing Common Problems Before They Start
Even with "easy" recipes, things can go sideways. The most common complaint I hear is about the bottom dough being "soggy" or the middle being "soupy." Most of the time, this comes down to oven temperature or how the ingredients were prepped.
Your dough is pale and soft
This usually happens because the oven wasn't fully preheated or the pan was placed too low. If the bottom doesn't get enough direct heat, the butter and sugar won't "fry" the dough. Always use a middle rack and give your oven a full 20 minutes to stabilize at 180°C.
The cheesecake layer is lumpy
If you see little white dots in your filling, your cream cheese was too cold. I’ve tried to "cheat" this by microwaving the cheese, but it often melts the fat too much. The best way to soften it quickly is to cut it into small cubes and let it sit on a plate for 20 minutes.
The top layer is puffing like a balloon
Sometimes the top dough traps a large bubble of steam. Don't panic! You can gently prick the bubble with a toothpick halfway through baking. This lets the steam escape without ruining the look of the bars.
| Problem | Root Cause | Solution |
|---|---|---|
| Soggy bottom | Too much butter or low heat | Ensure even butter spread; bake on middle rack. |
| Filling is runny | Underbaked or egg was too small | Bake until the center barely jiggles; use Large eggs. |
| Sugar is burnt | Oven running too hot | Check oven with a thermometer; tent with foil if browning too fast. |
Common Mistakes Checklist
- ✓ Always use "Full Fat" block cream cheese (the tub kind is too watery).
- ✓ Pat the crescent dough dry if you see any condensation when opening the can.
- ✓ Don't skip the almond extract; it provides the depth that makes it taste like a "churro."
- ✓ Let the bars cool at room temperature first; putting a hot pan in the fridge causes condensation (soggy crust).
- ✓ Use a metal pan for the crispiest bottom crust.
Budget Friendly Swaps and Tasty Twists
If you are looking to save even more money or just want to change things up, there are several ways to adapt this Churro Cheesecake Bars recipe. For example, if you want a more "authentic" Mexican street food feel, you can experiment with the spices.
The "Budget Hero" Version: If cream cheese is expensive in your area, you can substitute 25% of it with thick Greek yogurt. This adds a nice extra tang and increases the protein content, though the bars will be slightly softer.
You can also use a store brand cinnamon, but add a pinch of ground nutmeg to mimic the complexity of more expensive Ceylon varieties.
The "Sopapilla" Twist: If you prefer the honey drenched taste of a sopapilla, omit the sugar from the top layer before baking. Once the bars come out of the oven, immediately drizzle them with 1/4 cup of warm honey.
The honey will soak into the flaky crust while it's still hot, creating a sticky, decadent finish.
Scaling the Recipe
- Half Batch (8 bars): Use an 8x8-inch pan. Use 1 can of dough (cut in half), 1 block of cream cheese, and half an egg (beat an egg and use 2 tablespoons). Reduce bake time by about 5 minutes.
- Double Batch (32 bars): Do not try to double the recipe in one huge pan. The middle will never cook through. Instead, bake two separate 9x13 pans simultaneously, switching their rack positions halfway through.
| Method | Time | Texture | Best For |
|---|---|---|---|
| Standard Bake | 30 mins | Balanced | Everyone |
| Honey Drizzle | 30 mins | Sticky & Sweet | Sopapilla lovers |
| Cold Set Only | N/A | Dense/Fudgy | Simple No Bake Cheesecake fans |
The Simple No Bake Cheesecake method is a great reference if you ever want to see how cream cheese behaves without the heat, but for this specific recipe, the "bake" is what creates that churro magic.
Myths About Cheesecake Bars
Myth 1: You must use a water bath. Unlike a 6 inch tall New York style cheesecake, these bars are thin enough that they don't need the steam of a water bath. The crescent dough actually protects the filling from the direct intensity of the oven, acting as its own little insulation chamber.
Myth 2: Cinnamon sugar only goes on top. Many people forget the bottom layer. Putting the cinnamon sugar under the first layer of dough is what creates that caramelized "toffee" bottom.
It is the secret to making these taste like a fried churro rather than just a crescent roll with some sugar on it.
Practical Storage and Reducing Food Waste
Properly storing your Churro Cheesecake Bars is the difference between a crispy treat and a sad, soggy square. Because these contain dairy, they absolutely must stay in the fridge.
- Fridge: Store in an airtight container for up to 4 days. To keep the top as crispy as possible, place a paper towel over the top of the bars before sealing the lid. This absorbs any moisture that might evaporate.
- Freezer: These actually freeze beautifully. Wrap individual squares in plastic wrap and then foil. They will stay fresh for 2 months. To eat, thaw in the fridge overnight.
- Zero Waste Tip: If you have leftover cinnamon sugar, don't throw it away! Mix it into your morning coffee grounds or sprinkle it over buttered toast for a quick snack. If you have a tiny bit of cream cheese filling left, it makes a great dip for apple slices.
Serving Suggestions to Impress Your Guests
While these bars are a powerhouse on their own, serving them with a few extras can turn a simple dessert into a full experience. I personally love serving these slightly chilled with a side of fresh strawberries. The acidity of the berries cuts through the richness of the cream cheese perfectly.
If you are hosting a party, consider a "Dipping Station." Provide small bowls of warm dulce de leche, chocolate ganache, or even a tart raspberry coulis. Since the bars are essentially a portable churro, they are made for dipping. If you’re looking for something with a bit more crunch to serve alongside, these pair surprisingly well with Fudgy Chocolate Protein Bars for a high contrast dessert platter. The dark chocolate of the protein bars balances the sweet cinnamon of the cheesecake.
No matter how you serve them, remember that the "fail" in baking usually comes from overthinking. These bars are designed to be rustic, easy, and undeniably good. Trust the process, watch for that golden brown color, and don't be afraid to let them sit in the fridge it's that patience that turns a good bar into a great one.

Recipe FAQs
What do I need for a churro cheesecake?
You need two cans of crescent dough sheets, 16 ounces of full fat cream cheese, and one cup of sugar total. Additional pantry essentials include two tablespoons of cinnamon, a quarter cup of melted butter, one large egg, vanilla extract, and almond extract.
What are the common cheesecake bar mistakes?
The most frequent errors are using spreadable tub cream cheese and overbeating the filling. Always use full fat block cream cheese to avoid excess moisture, and mix the filling on medium low speed to prevent introducing air bubbles that cause the top to crack.
What are common churro mistakes?
Skipping the almond extract or failing to pat the crescent dough dry are the biggest pitfalls. The almond extract provides the signature flavor profile, and removing surface condensation from the dough prevents the bottom layer from becoming gummy while baking at 350°F.
Do you put churro cheesecake in the fridge?
Yes, but only after they have cooled completely at room temperature. Placing a hot pan directly into the refrigerator creates condensation, which will ruin the crisp texture of your crust.
Is it true I should use a glass pan for the best crust?
No, this is a common misconception. A metal pan is superior for this recipe because it conducts heat more efficiently, ensuring the bottom crescent layer becomes deep golden brown and crispy.
How to achieve the perfect golden crust?
Brush the bottom of your metal pan thoroughly with melted butter before sprinkling your first layer of cinnamon sugar. This creates a caramelized base as the bars bake for the full 28 32 minutes, providing the signature churro crunch.
How to ensure the filling stays smooth?
Beat your softened cream cheese and sugar until smooth, then add the egg and extracts at medium low speed. Stopping as soon as the ingredients are just combined prevents unnecessary air incorporation, resulting in a dense, creamy texture that sets perfectly.
Churro Cheesecake Bars
Ingredients:
Instructions:
Nutrition Facts:
| Calories | 271 kcal |
|---|---|
| Protein | 3.2 g |
| Fat | 18.7 g |
| Carbs | 23.5 g |
| Fiber | 0.4 g |
| Sugar | 12.8 g |
| Sodium | 234 mg |
