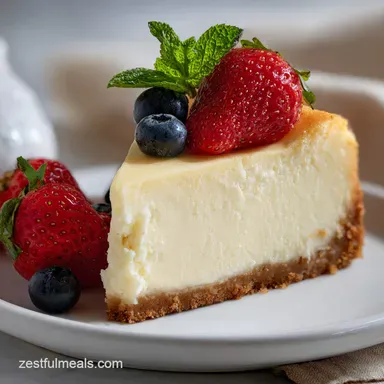
No-Bake Philly Cream Cheese Cheesecake with Graham Crust

- Time: 20 min active + 6 hours 20 mins chilling
- Flavor & Texture: Tangy, fluffy, and rich
- Perfect for: Last-minute parties or beginner bakers
No-bake cheesecake philly cream cheese
The best part about this dessert is that first slice. You get a buttery, salty crunch from the crust followed by a filling that feels like a dense cloud. It's the kind of treat that looks like it took all day but actually only requires a few minutes of active work.
You don't need a torch or a fancy oven for this. It's all about the chill. This no-bake cheesecake philly cream cheese gives you that classic New York style tang without the stress of a timer or a sinking center.
Since there's no baking involved, the texture stays light. It's ideal for summer days or when you just don't want to heat up the kitchen.
Why the Texture Works
- Dual Whipping: Beating the cheese and the cream in separate bowls keeps the filling light. Folding them together preserves the air bubbles so the cake doesn't turn into a heavy brick.
- Room Temp Cheese: Using softened cream cheese stops lumps from forming. This ensures the filling is smooth and glossy without needing to over-mix.
| Feature | No-Bake Version | Baked Classic |
|---|---|---|
| Prep Time | 20 minutes | 45 minutes |
| Texture | Fluffy and airy | Dense and creamy |
| Risk | Runny if not chilled | Cracking on top |
The Right Ingredients
The crust relies on the proper balance of butter and crumbs. Too much butter results in a greasy base, while too little makes it crumble during slicing. I include a pinch of salt to balance out the sugar.
For the filling, lemon juice is essential. The acidity ensures the cream cheese tastes vibrant rather than just rich. If you want a denser, more traditional version, you might like a Classic New York Cheesecake, though it requires several hours in the oven.
Ingredients
For the Crust
- 1½ cups (180g) graham cracker crumbs Why this? Creates a honey-wheat foundation
- 1/3 cup (75g) unsalted butter, melted Why this? Holds the crumbs together
- 2 tbsp (25g) granulated sugar Why this? Adds a touch of sweetness
- 1 pinch (1g) salt Why this? Cuts through the richness
For the Filling
- 16 oz (450g) Philadelphia cream cheese, softened Why this? Offers consistent stability and fat
- 1 cup (120g) powdered sugar, sifted Why this? Mixes in more easily than granulated sugar
- 1 tsp (5ml) pure vanilla extract Why this? Provides aromatic complexity
- 1 tbsp (15ml) fresh lemon juice Why this? Brightens the heavy fats
- 1½ cups (350ml) heavy whipping cream, chilled Why this? Gives the filling lift and volume
Recipe Specs
This recipe makes 12 servings. Each slice is rich, so a bit goes a long way. The total time is mostly passive chilling, which is the safest way to ensure the cake holds its shape.
Tools You'll Need

You only need a few basic tools. A 9 inch springform pan is essential here because it lets you release the sides without destroying the cake. A handheld mixer or a stand mixer works fine for the whipping stages.
From Prep to Plate
Phase 1: Building the Foundation
- Stir together 1½ cups graham cracker crumbs, 1/3 cup melted unsalted butter, 2 tbsp granulated sugar, and 1 pinch salt in a medium bowl. Stir until the mixture resembles wet sand.
- Pour the mixture into a 9 inch springform pan. Use the bottom of a flat measuring cup to press the crumbs firmly into the base and slightly up the sides.
- Place the pan in the freezer for 10 minutes to lock the crust in place.
Phase 2: Creating the Filling
- Beat 16 oz softened Philadelphia cream cheese and 1 cup sifted powdered sugar on medium-high speed. Beat until the mixture is completely smooth and lump-free.
- Stir in 1 tsp vanilla extract and 1 tbsp fresh lemon juice until fully incorporated.
- Beat 1½ cups chilled heavy whipping cream in a separate chilled bowl on high speed. Beat until stiff peaks form, meaning the cream stands straight up when the whisk lifts.
Phase 3: The Final Set
- Use a rubber spatula to gently fold the whipped cream into the cream cheese mixture. Use a cut and fold motion until no white streaks remain. Note: Don't stir vigorously or you'll deflate the air.
- Spoon the filling into the chilled crust and smooth the top with a spatula.
- Cover with plastic wrap and refrigerate for at least 6 hours.
- Run a thin knife around the edge of the pan before releasing the springform latch to slice.
Avoiding Kitchen Disasters
If the filling feels too soft, it's usually because the whipping cream didn't reach the right stage. Stiff peaks and the firm, chilled cream cheese together keep this cake upright since there's no gelatin or eggs.
Another common issue is the cream cheese temperature. If it's too cold, it won't emulsify with the sugar, leaving you with tiny white beads in your filling.
Filling Texture Issues
| Problem | Fix |
|---|---|
| Lumps in the cheese | Beat the cream cheese alone for 2 mins before adding sugar |
| Filling is too runny | Chill for an extra 2 hours or beat cream to firmer peaks |
| Crust is crumbling | Press harder with the measuring cup and freeze longer |
| Substitute | Replacement | Note |
|---|---|---|
| Graham Crackers | Digestive Biscuits | Slightly more salty, very similar texture |
| Lemon Juice | Lime Juice | Adds a tropical twist, slightly sharper |
| Heavy Cream | Coconut Cream | Use chilled full-fat; result is slightly softer |
Storage and Freshness
Keep the cheesecake in the springform pan or move it to an airtight container and store it in the fridge for up to 5 days.
This dessert freezes well. Slice it first and wrap each piece in parchment paper before putting them in a freezer bag. They stay fresh for up to 3 months. To eat, move a slice to the fridge 4 hours before serving to keep the original texture.
Presentation Tips
I like adding a layer of fresh berries on top right before serving. Raspberries or blueberries add a pop of color and a fresh acidity that works well with the cream cheese. For a cleaner look, dip your knife in hot water and wipe it dry between every single slice.
Swap and Tweak
Fruit Swirls
Mix in a few tablespoons of raspberry or strawberry jam. Fold it in carefully at the final stage to achieve a marbled swirl effect instead of a solid pink cake.
Zesty Twist
For a bolder taste, stir a teaspoon of fresh lemon zest into the cream cheese. This adds a fragrant citrus oil that juice by itself cannot provide.
Gluten-free Base
Replace the graham crackers with gluten-free crumbs. Keep the ratios of sugar and butter exactly the same.
Recipe FAQs
Can cream cheese be used in a no-bake cheesecake?
Cream cheese serves as the primary base for this dessert.
Tip: ensure the cheese is softened to room temperature to prevent lumps.
How to mix the filling for this cheesecake?
Beat softened cream cheese and powdered sugar until smooth, stir in vanilla and lemon, then fold in stiffly beaten heavy cream.
Tip: use a rubber spatula for the folding process to maintain the light texture.
Does this recipe use gelatin to set?
This version relies on chilled heavy cream and cold temperatures rather than gelatin.
Tip: chill your mixing bowl for the heavy cream to help it reach stiff peaks faster.
Is it possible to make a three-ingredient version?
A basic version exists using only cream cheese, sugar, and cream.
Tip: the lemon juice and vanilla in this recipe add essential brightness and depth.
Where should the finished cheesecake be stored?
Refrigerate the cake in its springform pan or an airtight container for as long as 5 days.
Tip: Wrap individual slices in parchment paper before freezing to preserve them for 3 months.
No-Bake Philly Cheesecake for 12 Slices