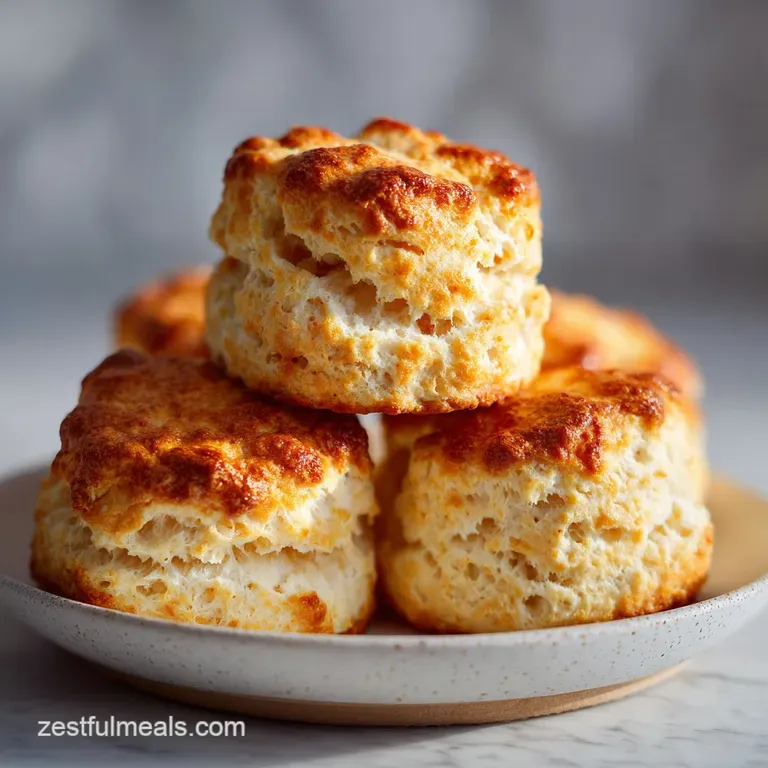
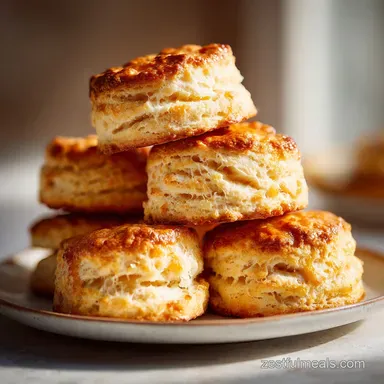
Easy Tea Biscuits: Flaky Butter Layers
- Time: Active 10 minutes, Passive 15 minutes, Total 25 minutes
- Flavor/Texture Hook: Flaky, buttery layers with a crisp, sugar dusted exterior
- Perfect for: Afternoon tea, beginner bakers, or a quick weekend treat
- Crafting Flaky And Old Fashioned Homemade Tea Biscuits
- The Science Of Steam and Fat Incorporation
- Essential Specifications For A Better Bake
- Selecting Components For Maximum Flaky Texture
- Minimal Tools Required For This Recipe
- Step By Step Guide To Baking Success
- Expert Success Strategies And Failure Points
- Adapting For Different Nutritional Needs
- Preserving Freshness And Reducing Food Waste
- Ideal Pairings For Your Warm Bake
- Recipe FAQs
- 📝 Recipe Card
Crafting Flaky And Old Fashioned Homemade Tea Biscuits
Imagine the kitchen at 4 PM on a rainy Tuesday. The oven door swings open, and a rush of warm, salted butter aroma hits your face. There is a specific sound when you pull these apart a gentle "shatter" of the outer crust followed by the soft sigh of steam escaping from the tender, layered middle.
This is the magic of a classic recipe that relies more on technique than fancy gadgets.
I remember my first attempt at this bake. I was so worried about the dough being "smooth" that I kneaded it like pizza dough. Big mistake. I ended up with something closer to a hockey puck than a pastry. Since then, I’ve learned that the less you do, the better they become.
We want shaggy, we want cold, and we want fast. If your hands are warm, run them under cold water before you start.
When you master these Tea Biscuits, you realize they are the ultimate blank canvas. Whether you enjoy them plain, slathered in jam, or with the optional pops of sweetness from sultanas, the goal is always that skyscraper rise.
We're going to use a grating technique that changed my life no pastry cutter required. Just you, a box grater, and a bit of "cold gold" (that's our frozen butter).
The Science Of Steam and Fat Incorporation
The Cold Gold Expansion: When frozen butter hits a 200°C oven, the water inside the fat evaporates instantly, creating pockets of steam that lift the flour layers. If the butter melts before it bakes, you lose that height and end up with a greasy, flat disc.
Chemical Leavening Synergy: The high ratio of baking powder reacts first with the milk's moisture and then again with the oven's heat, providing a secondary lift that ensures a light, airy crumb.
| Method | Time | Texture | Best For |
|---|---|---|---|
| Oven (Standard) | 15 minutes | Tall rise, crispy top | Classic flaky layers |
| Stovetop (Cast Iron) | 20 minutes | Dense, crusty bottom | Rustic, "bannock" style |
| Air Fryer | 12 minutes | Very crunchy exterior | Small batches (2-4 units) |
While the oven is our gold standard for that signature "shatter" on the crust, the stovetop method is a fun backup if you’re camping or your oven is occupied by a roast. Just keep the heat low and use a heavy lid to trap the steam. Speaking of tea time, if you're looking for something to sip alongside these, this Pineapple Tea Recipe offers a vibrant, spicy contrast to the buttery crumb.
Essential Specifications For A Better Bake
To get the most out of your bake, precision matters where it counts. I’ve found that using a kitchen scale for the flour (250g) prevents the common "scoop and pack" error that leads to dry, crumbly dough. If you don't have a scale, fluff your flour with a fork before gently spooning it into your measuring cup.
Component Analysis
| Ingredient | Science Role | Pro Secret |
|---|---|---|
| All purpose Flour | Provides structure via gluten | Sift it twice to incorporate air for a lighter feel. |
| Frozen Butter | Creates steam pockets | Grate it directly into the flour to keep it from melting. |
| Baking Powder | Primary leavening agent | Ensure it's fresh; old powder is the #1 cause of "flat biscuit syndrome." |
| Whole Milk | Hydrates starches | Keep it ice cold to protect the butter's integrity. |
The interaction between the cold milk and the frozen butter is what keeps the dough's temperature low until it hits the heat. If you're feeling adventurous after mastering this, you might find the same principles of fat management apply to the base of a Simple No Bake Cheesecake recipe, though the goals for texture are slightly different.
Selecting Components For Maximum Flaky Texture
Gathering your ingredients is the first step toward success. Don't skip the "frozen" part of the butter it's the single most important factor for success.
- 2 cups (250g) All purpose flour: Sifted. Why this? Prevents clumps and ensures even distribution of the leavening agents.
- 1 tbsp baking powder: Why this? Gives the necessary "oomph" for a tall, airy rise.
- 0.5 tsp salt: Why this? Sharpens the buttery flavors and balances the sugar.
- 2 tbsp granulated sugar: Why this? Aids in browning the tops and adds a hint of sweetness.
- 0.5 cup (115g) unsalted butter: Frozen. Why this? Creates the characteristic flaky layers when it hits the heat.
- 0.75 cup (180ml) cold whole milk: Why this? Provides fat for tenderness and moisture for hydration.
- 1 tsp vanilla extract: Why this? Adds a floral aroma that defines "tea time" vibes.
- 1 tbsp melted butter: Why this? Used for brushing the tops for a golden finish.
- 0.5 cup (75g) sultanas or raisins: Why this? Adds chew and natural sweetness; optional but traditional.
| Original Ingredient | Substitute | Why It Works |
|---|---|---|
| Whole Milk | Buttermilk | Adds a tangy flavor and reacts with baking powder for more lift. |
| Unsalted Butter | Salted Butter | Works fine just omit the extra 0.5 tsp of salt from the recipe. |
| Sultanas | Dried Cranberries | Provides a tart pop of color. Note: Adds more acidity to the flavor profile. |
If you want a savory twist, skip the sugar and raisins and add a cup of sharp cheddar. These savory tea biscuits biscuits (pardon the repetition!) pair excellently with a hearty meal like a Spicy Ground Beef recipe if you're looking for a side that can soak up a good sauce.
Minimal Tools Required For This Recipe

We don't need a stand mixer here. In fact, a stand mixer is your enemy for this specific bake because it's too easy to over mix. Grab a large mixing bowl and a box grater. The grater is my favorite "hack" for people who don't want to spend 10 minutes cutting butter into flour with two knives or a pastry blender.
It’s faster and keeps the butter colder.
You’ll also need a baking sheet heavy duty is better to prevent the bottoms from scorching and some parchment paper. If you don't have a biscuit cutter, a clean glass jar or a drinking glass works perfectly. Just remember the golden rule: do not twist the glass when you press down!
We want clean cut edges so the layers can expand upward.
step-by-step Guide To Baking Success
Follow these steps closely, and keep an eye on the clock. Speed is your friend because it keeps the dough cold.
- Prep the heat. Preheat your oven to 200°C (400°F). Note: A hot oven is crucial for that immediate steam burst.
- Mix dry elements. Whisk 250g flour, baking powder, salt, and sugar in a large bowl.
- Grate the butter. Take your 115g frozen butter and grate it directly into the flour mixture using the large holes of a box grater.
- Toss lightly. Use a fork to toss the butter shreds in the flour until every piece is coated. until it looks like coarse meal.
- Add inclusions. Fold in your 75g raisins if using.
- Combine liquids. Mix 180ml cold milk with 1 tsp vanilla extract.
- Hydrate the dough. Pour the milk into the dry ingredients. Stir with a fork just until a shaggy dough forms. Note: Stop before it looks smooth!
- The "Pat and Fold". Turn dough onto a floured surface. Pat it into a rectangle, fold it in half, and repeat three times. until the dough barely holds together.
- Cut the rounds. Press your cutter straight down to make 12 biscuits.
- Final touch and bake. Place on a tray, brush with 1 tbsp melted butter, and bake 15 minutes until golden and crackling.
Chef's Tip: Freeze your box grater for 10 minutes before grating the butter. It prevents the heat from the metal from softening the fat.
Expert Success Strategies And Failure Points
The biggest hurdle is the "feel" of the dough. It should feel slightly tacky but not stick to your fingers like glue. If it's too wet, it will spread; if it's too dry, it won't rise.
Why Your Bake Is Flat
If your biscuits didn't reach the heights you hoped for, it's usually down to the "cut." When you twist the cutter, you "seal" the edges of the dough, effectively gluing the layers together. This prevents the steam from pushing the layers apart.
| Problem | Root Cause | Solution |
|---|---|---|
| No Rise | Twisting the cutter | Press straight down and lift straight up. |
| Tough Texture | Over handling dough | Stop mixing the moment the milk is incorporated. |
| Greasy Bottoms | Butter was too soft | Use frozen butter and a preheated 200°C oven. |
One mistake I once made was using a dark, thin baking sheet without parchment. The bottoms turned black before the centers were even warm. Always use parchment paper or a silicone mat; it acts as a heat buffer and ensures the bottom is just as golden brown as the top.
Common Mistakes Checklist
- ✓ Ensure baking powder is less than 6 months old for maximum lift.
- ✓ Keep all liquid ingredients in the fridge until the very second you need them.
- ✓ Avoid using a rolling pin; your hands are gentler and preserve the air pockets.
- ✓ Arrange biscuits so they are just touching on the tray; they help each other climb higher.
- ✓ Never "twist" the cutter this is the most common reason for lopsided bakes.
Adapting For Different Nutritional Needs
This Easy Tea Biscuit Recipe is quite flexible. If you're hosting someone with dietary restrictions, you don't have to sacrifice that silky interior.
Vegan Tea Biscuit Swap
To make these vegan, replace the butter with a high-quality vegan butter stick (ensure it’s frozen) and swap the whole milk for unsweetened soy or oat milk. Add 1/2 teaspoon of lemon juice to the plant milk to mimic the acidity of buttermilk, which helps with the rise.
The texture will be slightly less "shatter crisp" but still incredibly tender.
Savory Herb Variation
If you want to skip the "sweet" side of things, remove the sugar and vanilla. Instead, fold in 1 tablespoon of fresh chopped rosemary or thyme and 50g of grated Parmesan cheese. This savory version is the "Best Tea Biscuit Recipe" for serving alongside soups or stews.
If you want X, do Y
- If you want a crunchier top, sprinkle a little extra granulated sugar over the melted butter before baking.
- If you want softer sides, place the biscuits close together so they touch on the baking sheet.
- If you want more layers, do five "folds" instead of three during the pat down process.
Preserving Freshness And Reducing Food Waste
Tea biscuits are best enjoyed within 20 minutes of leaving the oven that's when the contrast between the crispy shell and velvety middle is at its peak. However, life happens, and you might have leftovers.
Storage: Keep them in an airtight container at room temperature for up to 2 days. To revive that "just baked" feel, pop them in a 150°C oven for 5 minutes. Avoid the microwave, as it will make the crust rubbery.
Freezing: You can freeze the unbaked dough rounds! Place them on a tray in the freezer for an hour, then transfer to a freezer bag. Bake directly from frozen, adding about 3-5 minutes to the total cook time.
Zero Waste Tip: If you have biscuits that have gone truly stale, don't toss them. Pulse them in a food processor to make buttery breadcrumbs. These are incredible as a topping for mac and cheese or used as a base for a trifle style dessert.
You can even use the leftover flour dust from your workspace to start a "scrap" jar for your next thickening roux.
Ideal Pairings For Your Warm Bake
What you serve with your biscuits can change the whole experience. While a simple cup of Earl Grey is the traditional choice, there's room to get creative.
A thick dollop of clotted cream or high fat European butter is non negotiable for some. If you’re leaning into the sultana version, a bitter orange marmalade provides a sophisticated balance to the sugar.
For a more substantial meal, these biscuits are sturdy enough to be the base for "biscuits and gravy," or you could serve them alongside a platter of sharp cheeses and honey.
Whatever you do, make sure the biscuits are the star. This Simple Tea Biscuits method is all about celebrating the humble ingredients of flour and fat. There’s something deeply satisfying about making something this elegant using only a bowl and a grater.
Honestly, don't even bother with the low-fat versions of milk or butter; the fat is what carries the flavor and creates the structure we love. Right then, let's crack on and get those ovens preheated your future self will thank you when that first buttery bite shatters in your mouth.
Scaling For Crowds
- Down (Making 6): Use a small bowl, reduce baking time by 2 mins, and use half a beaten egg if you need a wash.
- Up (Making 24): Double everything but keep the salt to 1.5x (0.75 tsp). Work in two batches to keep the second half of the dough in the fridge while the first bakes.
- Baking (2x): If you use two racks, swap the trays halfway through to ensure even browning.
Debunking Kitchen Myths
One common myth is that you must "cream" the sugar and butter for biscuits. That’s for cookies! For biscuits, we want distinct chunks of fat. Another myth is that the dough needs to rest. In reality, as soon as the liquid hits the baking powder, the clock starts ticking.
The longer it sits on the counter, the less it will rise in the oven. Bake it immediately for the best results. Searing or "pre cooking" the raisins is also unnecessary; they hydrate perfectly during the short 15 minute bake.

Recipe FAQs
Is it true that I must use a pastry cutter to incorporate the cold butter?
No, using a box grater is faster and better. Grating frozen butter directly into the flour keeps the fat colder than traditional cutting methods, ensuring maximum steam lift.
How to ensure maximum height and flaky layers in my biscuits?
Press your cutter straight down without twisting. Twisting seals the edges of the dough, preventing the steam from pushing the layers apart upwards.
Can I use room temperature butter for this recipe?
No, frozen butter is essential for the signature flaky texture. Room temperature butter melts before the dough sets, resulting in a flat, greasy biscuit.
How to revive biscuits that are a day old?
Heat them in a 150°C oven for 5 minutes. This reactivates any remaining moisture to restore the flaky crust; avoid using the microwave.
What is the ideal temperature for the milk used in the dough?
Keep the milk ice cold, straight from the refrigerator. Cold liquids maintain the low temperature of the dough, protecting the frozen butter pieces until they bake.
How do I make sure my biscuits aren't tough?
Handle the dough as little as possible after adding the liquid. Overworking develops gluten, so stir just until a shaggy mass forms and then stop mixing.
Can I prepare the dough ahead of time for baking later that day?
Yes, chill the cut rounds for 15 minutes before baking. This further solidifies the fat, but never let the raw dough sit for more than an hour at room temperature.
Easy Tea Biscuits Recipe
Ingredients:
Instructions:
Nutrition Facts:
| Calories | 190 kcal |
|---|---|
| Protein | 2.8 g |
| Fat | 9.5 g |
| Carbs | 23.8 g |
| Fiber | 1.1 g |
| Sugar | 8.4 g |
| Sodium | 242 mg |
