Homemade Protein Bars: Chewy and Almond Rich
- Time:15 minutes prep + 1 hour chilling = 75 minutes total
- Flavor/Texture Hook: Fudgy, almond rich, and slightly salty with a chocolate snap
- Perfect for: Sunday meal prep and avoiding overpriced gym lobby snacks
- Best Chewy Homemade Protein Bars Recipe
- From Ancient Fuel to Your Gym Bag
- Why Most Recipes Get This Wrong
- Timing and Texture Checkpoints for Success
- Quality Ingredients for Better Muscle Fuel
- Minimalist Tools for Fast Snack Prep
- How to Mix and Set Bars
- Fixing Texture and Binding Issues Fast
- Smart Swaps for Different Dietary Needs
- Scaling for Large Batches
- Debunking Protein Bar Myths
- Keeping Your Batch Fresh and Tasty
- Perfect Pairings for Busy Morning Fuel
- Recipe FAQs
- 📝 Recipe Card
Best Chewy Homemade Protein Bars Recipe
Portable energy is not a modern invention. Long before we had neon wrapped bars in gym bags, nomadic cultures were masters of the high protein, long shelf life snack. The Native Americans had pemmican, a mix of tallow, dried meat, and berries that could last for years.
In the Middle East, date and nut pastes provided immediate fuel for long desert treks. This recipe for Homemade Protein Bars taps into that same primal need for dense, reliable nutrition, though we've swapped the dried meat for almond butter and chocolate.
I used to spend a fortune on store-bought bars that tasted like flavored chalk. They were either too sweet or had a weird aftertaste that lingered for hours. One afternoon, after staring at a long list of unpronounceable ingredients on a $4 wrapper, I decided to just throw what I had in my pantry into a bowl.
The result was miles better than anything I'd bought. This version is built for the busy cook who wants a reliable snack without the chemistry degree requirements.
We are focusing on a no bake method here because it preserves the integrity of the almond butter's healthy fats and keeps the oats from getting too dry. It’s the ultimate kitchen win: less work, better texture, and a much lower price point per serving.
You get ten bars out of one batch, which usually lasts me through a full work week plus a few weekend hikes.
From Ancient Fuel to Your Gym Bag
The transition from traditional energy balls to the modern bar format happened as life got faster and more segmented. In the mid-20th century, "space food" became a fascination, leading to the first commercial energy bars that looked like something out of a sci fi movie.
While those early versions were functional, they lacked the sensory joy of actual cooking. This recipe brings that joy back into the mix.
We're aiming for a texture that is substantial but not a jaw workout. By using a mix of creamy almond butter and ground flaxseed, we create a binding system that holds up even if the bars sit in your bag for a few hours.
This isn't just about protein; it's about a balanced snack that keeps you full because of the fiber in the oats and flax.
When you make these, you'll notice the aroma of the vanilla and almond butter hitting you immediately. It's worlds away from the sterile smell of a factory sealed bar. There is something deeply satisfying about pressing the dough into the pan, knowing exactly what is going into your body.
Let's look at why this specific combination of ingredients works so well from a structural standpoint.
Why Most Recipes Get This Wrong
Most people treat protein powder like flour, but it behaves more like a sponge. If you don't balance it correctly, you end up with a bar that is either a sticky mess or a crumbly brick.
- Fat to Powder Ratio: Almond butter provides the necessary lipids to coat the protein particles, preventing that "chalky" mouthfeel.
- Hydration Timing: Adding almond milk one tablespoon at a time allows the oats to absorb moisture slowly, ensuring the bars stay chewy rather than soggy.
- Cold Setting Matrix: Chilling the bars solidifies the honey and almond butter, creating a firm structure without the need for eggs or baking.
- The Flax Factor: Ground flaxseed acts as a secondary binder, absorbing excess liquid and creating a cohesive dough that won't fall apart when sliced.
| Method | Time | Texture | Best For |
|---|---|---|---|
| No Bake (This Recipe) | 15 mins + chill | Fudgy and chewy | Retaining nutrients and quick prep |
| Baked Version | 30 mins + cool | Cake like and dry | Those who prefer a toasted oat flavor |
| Stovetop Melt | 20 mins + chill | Hard and candy like | A more decadent, dessert style bar |
The cold set method used here is arguably the most efficient way to meal prep. It avoids the risk of over baking, which often turns protein heavy snacks into something resembling a hockey puck. By keeping the ingredients raw, we also keep the flavor of the honey and vanilla much more vibrant.
Timing and Texture Checkpoints for Success
To get the most out of this process, keep these specific numeric markers in mind. The difference between a bar that holds its shape and one that slumps is often just a few minutes of chilling or a single tablespoon of liquid.
Component Analysis
| Ingredient | Science Role | Pro Secret |
|---|---|---|
| Almond Butter | Primary Binder | Use "drippy" natural styles for easier mixing |
| Rolled Oats | Structural Base | Pulse half the oats in a blender for a smoother bar |
| Protein Powder | Nitrogen Source | Whey/Casein blends yield a much better texture than pure isolate |
If you find yourself needing a savory snack after all this sweetness, these bars actually sit well in a meal prep rotation alongside something like a homemade chicken tenders recipe. Having both sweet and savory high protein options ready to go is the secret to staying on track with your nutrition goals.
Quality Ingredients for Better Muscle Fuel
- 2 cups Old-fashioned rolled oats: These provide the bulk and a steady release of energy. Why this? Quick oats turn into mush; rolled oats provide a necessary "bite" and fiber.
- 1 cup Creamy almond butter: This is our glue and healthy fat source. Why this? It has a more neutral, sophisticated flavor profile compared to peanut butter.
- 1/4 cup Honey: The natural sugar helps the bars stick together. Why this? It acts as a viscous liquid binder that hardens when chilled.
- 1 tsp Pure vanilla extract: For that classic bakery aroma. Why this? It masks the sometimes medicinal taste of certain protein powders.
- 1/4 tsp Fine sea salt: To balance the sweetness. Why this? Salt highlights the nutty notes of the almond butter.
- 1/2 cup Protein powder: The namesake ingredient. Why this? Choose a vanilla or chocolate flavor that you actually enjoy drinking.
- 2 tbsp Ground flaxseed: Adds omega-3s and helps binding. Why this? It absorbs moisture, keeping the bars from feeling oily.
- 1/4 cup Unsweetened almond milk: For hydration. Why this? It allows you to adjust the dough consistency without adding extra fat.
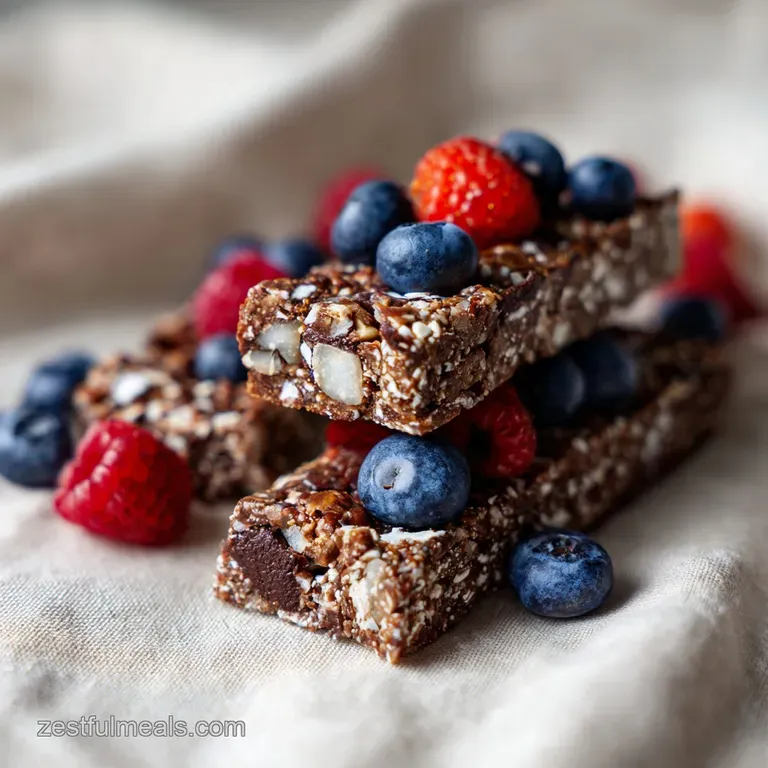
- 1/3 cup Mini dark chocolate chips: For texture and a hint of indulgence. Why this? Mini chips ensure you get chocolate in every single bite.
- 1/4 cup Crushed raw almonds: For a necessary crunch. Why this? It breaks up the soft texture of the base dough.
For a substitute, you can use maple syrup instead of honey, but be aware the bars will be slightly softer. If you're out of almond butter, cashew butter works beautifully as a 1:1 swap.
Minimalist Tools for Fast Snack Prep
You don't need a high end food processor for this. In fact, doing it by hand gives you a better feel for the dough's hydration. A large, sturdy mixing bowl is essential because you’ll be doing some aggressive stirring. I prefer a heavy glass or stainless steel bowl that won't slide around the counter.
An 8x8 inch square baking pan is the standard size here. If you use a larger pan, your bars will be thin and flimsy; a smaller pan will make them thick and hard to bite. The most important tool, though, is parchment paper. Do not skip this.
Without it, you’ll be chiseling your Homemade Protein Bars out of the pan piece by piece. Leave a couple of inches of overhang on the sides - these act as "handles" to lift the whole block out once it's set.
How to Mix and Set Bars

- Line an 8x8 inch square baking pan with parchment paper, leaving an overhang on the sides for easy removal.
- In a large mixing bowl, stir together the almond butter, honey, and vanilla extract until a smooth, glossy paste forms. Note: If your nut butter is cold from the fridge, microwave it for 20 seconds to make it workable.
- Fold in the rolled oats, protein powder, ground flaxseed, and sea salt. The mixture will look dry and crumbly at first.
- Add the almond milk one tablespoon at a time, mixing aggressively until the dough sticks to itself when pressed. Note: Don't dump it all in at once; you might not need the full 1/4 cup.
- Fold in the mini dark chocolate chips and crushed almonds until they are evenly distributed throughout the mass.
- Transfer the mixture to the prepared pan and press down firmly until the surface is flat and even. Note: Use the bottom of a measuring cup to really pack it in there.
- Place the pan in the refrigerator and chill for at least 1 hour to allow the binders to solidify.
- Remove the block from the pan using the parchment handles and slice into 10 even bars.
Fixing Texture and Binding Issues Fast
The most common issue I hear about is the bars being too crumbly. This usually happens if the protein powder was particularly absorbent or the oats were very dry. If you find the mixture won't hold a shape when you squeeze a handful, you simply need more moisture.
The Mixture is Too Crumbly
If your dough looks like granola rather than a bar base, add almond milk half a tablespoon at a time. You want it to feel heavy and slightly tacky. If it's already in the pan and you realize it's too dry, you can actually dump it back into the bowl, add a splash of honey or milk, and re press it. It's very forgiving.
The Bars Are Too Soft
If they seem more like fudge that melts in your fingers, you likely added too much liquid or your nut butter was very oily. The fix is to add a few more tablespoons of oats or protein powder to soak up that excess. Also, ensure you are chilling them for the full 1 hour.
Time in the cold is a non negotiable ingredient here.
| Problem | Root Cause | Solution |
|---|---|---|
| Bars fall apart | Lack of binder | Add 1 tbsp more honey or nut butter |
| Gritty mouthfeel | Unmixed powder | Whisk powder with milk before adding to oats |
| Too sticky to handle | Excess moisture | Fold in 2-3 tbsp extra rolled oats |
Common Mistakes Checklist
- ✓ Using "natural" nut butter without stirring it first (the oil separation ruins the ratio)
- ✓ Forgetting to line the pan (you will end up with a pan of "protein bark" instead of bars)
- ✓ Adding all the milk at once (different brands of protein powder have wildly different absorption rates)
- ✓ Slicing the bars while they are still room temperature (they will squish and lose their shape)
- ✓ Not pressing the mixture hard enough into the pan (use your full body weight!)
Smart Swaps for Different Dietary Needs
If you want to move away from the almond base, there are plenty of directions to take this. For those who want a more decadent, treat like experience, you might enjoy looking at a Banana Pudding Cheesecake Bars recipe for inspiration on layering flavors, though those are definitely more for dessert than the gym!
For Protein Bars Without Protein Powder
You can replace the 1/2 cup of protein powder with 1/2 cup of almond flour or more ground flax and hemp hearts. The protein count will be lower, but the texture will be incredibly fudgy and the bars will be entirely "whole food" based.
For Muscle Gain (Calorie Dense)
To increase the caloric density, swap the almond milk for full fat coconut milk and add a layer of melted dark chocolate on top. You can also mix in some dried cranberries or chopped dates for extra carbohydrates to fuel longer training sessions.
For a Quick Breakfast
If you're eating these as a meal replacement, add a tablespoon of chia seeds to the mix. They provide extra fiber and will help you feel fuller for longer. I often pair one of these with a hard boiled egg for a complete 20 minute morning routine.
Scaling for Large Batches
When scaling these Homemade Protein Bars up for a month long supply, work in batches. If you try to mix a triple batch in one bowl, it becomes physically difficult to incorporate the protein powder evenly.
- Scaling UP (2x): Use a 9x13 inch pan. Use exactly double the ingredients, but keep the salt at 1.5x to avoid an overly salty finish.
- Scaling DOWN (1/2): Use a standard loaf pan. This is perfect if you just want to test a new flavor of protein powder without committing to 10 bars. Reduce the chilling time to 45 minutes as the thinner mass cools faster.
For baking enthusiasts who want to scale up their skills, this process of understanding hydration is very similar to what you'd find in a bread in a bag recipe, where the manual feel of the dough tells you exactly when it's ready.
Debunking Protein Bar Myths
One persistent myth is that you must use whey protein for bars to work. In reality, plant based proteins (like pea or brown rice) often make better bars because they are more fibrous and hold their shape better at room temperature. Whey can sometimes become "greasy" if the bars get warm.
Another misconception is that homemade bars don't last. While they don't have the three year shelf life of a commercial bar packed with preservatives, they are remarkably stable. The high fat content in the nuts and the low water activity in the honey mean bacteria has a hard time growing.
Keeping Your Batch Fresh and Tasty
Storage: Keep these in an airtight container in the refrigerator for up to 2 weeks. I recommend placing a small square of parchment paper between the bars if you are stacking them, as they can sometimes stick together over time.
Freezing: These bars freeze beautifully. Wrap individual bars in plastic wrap and store them in a freezer bag for up to 3 months. You can eat them straight from the freezer for a firm, chewy texture, or let them sit in your bag for 20 minutes to soften up.
Zero Waste: If you reach the end of the container and have a bunch of crumbs and broken pieces, don't throw them away. Those crumbles are essentially "protein granola." Toss them over a bowl of Greek yogurt or oatmeal for an easy breakfast upgrade.
You can also pulse the scraps in a blender and use them as a "crust" for a healthy cheesecake or tart.
Perfect Pairings for Busy Morning Fuel
Since these bars are dense and nutty, they pair perfectly with acidic or bright flavors. A cold brew coffee with a splash of cream is the classic choice, as the bitterness of the coffee cuts through the richness of the almond butter.
If you’re using these as a post workout recovery, I suggest pairing them with a piece of fresh fruit like a green apple or a pear. The crunch and hydration from the fruit balance the fudgy texture of the bar.
For a truly efficient meal prep Sunday, I usually make these bars while my oven is occupied with something else, like a batch of savory snacks, ensuring every minute in the kitchen counts toward a week of better eating.

Recipe FAQs
Is it better to make your own protein bars?
Yes, homemade bars are superior. You avoid the excessive preservatives and artificial sweeteners found in store-bought options while ensuring you use high-quality ingredients like almond butter and rolled oats.
Which protein bar is best for diabetics?
Bars utilizing high fiber, low-sugar ingredients are generally preferred. Since this recipe uses oats, flaxseed, and almond butter, it provides a slower digestion rate, though you should always consult your medical provider regarding your specific dietary needs.
What are the snack bars for CKD patients?
No specific bar is universally recommended for CKD patients. You must strictly monitor protein, phosphorus, and potassium levels in all ingredients; always review this recipe with your renal dietitian to ensure it aligns with your prescribed plan.
Are protein bars good for surgery recovery?
Yes, they provide necessary calories and protein for tissue repair. These bars offer a nutrient dense snack that is easy to consume, similar to the high protein balance needed in post operative nutritional support.
How to prevent the bars from falling apart?
Press the mixture firmly into the pan using the bottom of a flat measuring cup. Applying your full body weight creates the density required for the bars to hold their shape once chilled.
Is it true I must slice the bars immediately after mixing?
No, this is a common misconception. You must chill the pan in the refrigerator for at least 1 hour first; slicing at room temperature will cause the bars to squish and lose their structural integrity.
How to fix dry, crumbly dough?
Add the almond milk one tablespoon at a time. Mix aggressively between additions until the dough reaches a consistency that sticks to itself when pressed, as protein powders absorb moisture at different rates.
Homemade Protein Bars

Ingredients:
Instructions:
Nutrition Facts:
| Calories | 334 calories |
|---|---|
| Protein | 12.6g |
| Fat | 20.1g |
| Carbs | 29.2g |
| Fiber | 5.8g |
| Sugar | 10.8g |
| Sodium | 92mg |
