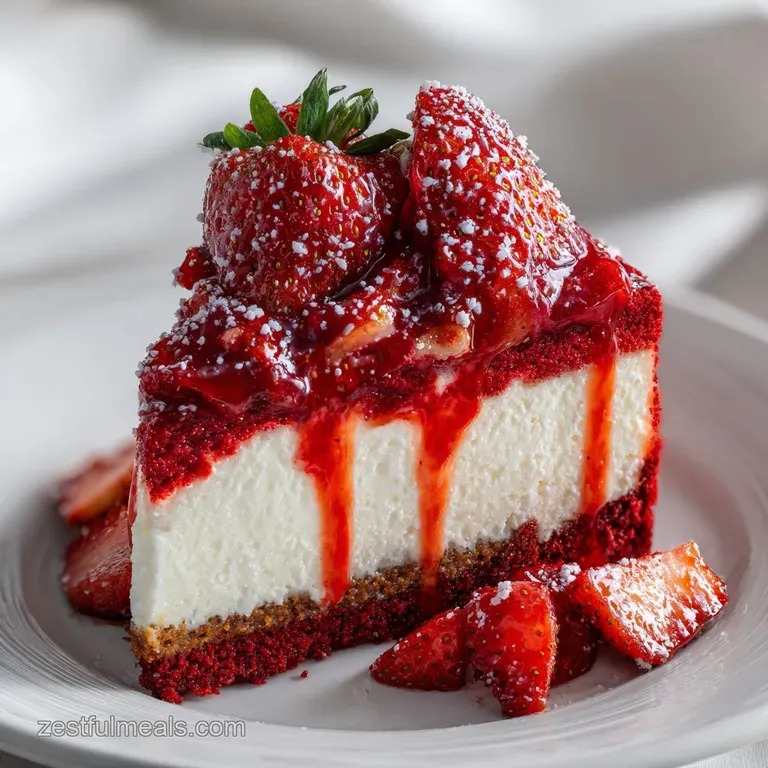
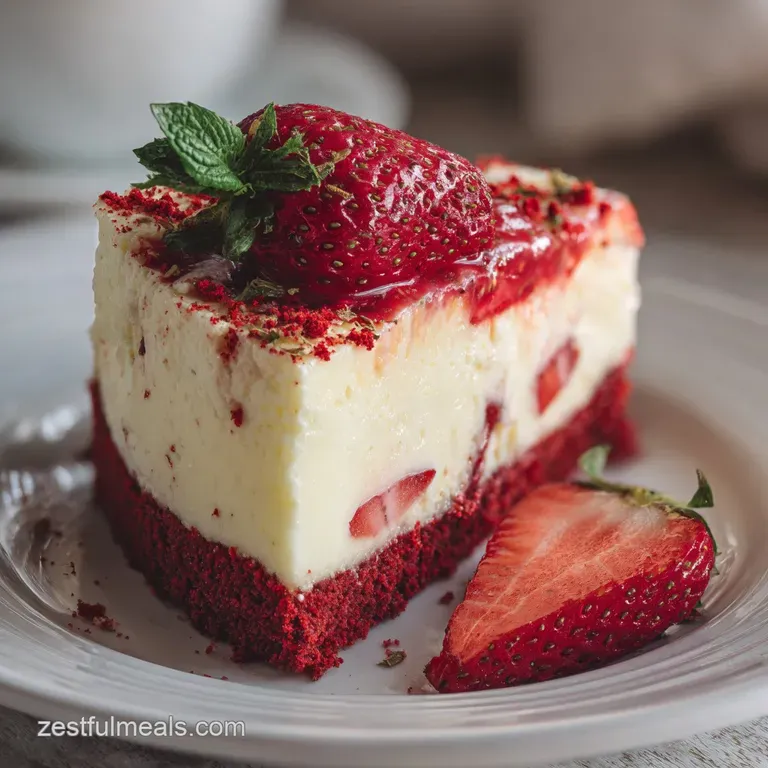
Red Velvet Strawberry Cheesecake: Velvety Crumb
- Time: Active 30 minutes, Passive 1 hours, Total 1 hours 30 mins
- Flavor/Texture Hook: Velvety crumb meets tangy, fruit flecked cream
- Perfect for: Milestone birthdays, Valentine's Day dinner, or a sophisticated weekend project
- Create a Luscious Red Velvet Strawberry Cheesecake
- Why This Recipe Always Wins
- The Details You Need First
- The Elements of the Bake
- Tools for the Best Result
- Assembling Your Striking Layers
- Avoid These Common Baking Mistakes
- Flavor Swaps and Simple Switches
- Keeping Your Dessert Fresh Longer
- Perfect Drinks and Toppings
- Recipe FAQs
- 📝 Recipe Card
Create a Luscious Red Velvet Strawberry Cheesecake
The first time I tried making this, I was terrified. I had this vision of a deep mahogany cake base supporting a cloud like strawberry center, but I just knew I was going to end up with a red stained mess or a cracked top that looked like a dry canyon.
There is something about the aroma of cocoa and vinegar hitting that warm buttermilk that makes my kitchen feel like a high end patisserie, though. It is a scent that promises something rich and slightly sophisticated, and I was determined to get it right without the stress of a pastry chef.
I spent three weekends straight testing this Red Velvet Strawberry Cheesecake, and let me tell you, I made every mistake in the book. I overbeat the eggs, which made the cheesecake puff up like a soufflé and then collapse.
I forgot to strain the strawberry puree, which left weird little seeds in the otherwise velvety texture. But through those failures, I found the "sweet spot" of timing and temperature that works every single time.
It is not about being a pro, it is about respecting the ingredients and letting the oven do the heavy lifting.
We are going to walk through this together, step-by-step. I will show you exactly when to pull it out of the oven and how to avoid the "bleeding" effect where the red cake stains your beautiful white filling.
This is the kind of recipe that makes people think you have secret culinary training, but really, you just know the right tricks. Let's get into the details and turn your kitchen into the best bakery in town.
Why This Recipe Always Wins
The magic here is not just in the colors, but in the specific chemical reactions that happen between the acidic buttermilk and the cocoa powder. This creates a crumb that is far more tender than a standard chocolate cake.
When you pair that soft base with the dense, rich nature of a Philadelphia Cream Cheese recipe, you get a contrast that is absolutely addictive.
- Acid Base Tenderization: The vinegar and buttermilk react with the baking soda to create immediate carbon dioxide bubbles, ensuring the red velvet base stays light rather than dense and gummy.
- Fat Stabilization: Using vegetable oil in the cake base ensures it stays moist even after being refrigerated, whereas butter based cakes can turn hard and dry when chilled alongside cheesecake.
- Protein Coagulation: The sour cream in the filling lowers the overall pH, which helps the egg proteins set into a more delicate, creamy structure rather than a rubbery one.
The Science of the Crimson Crumb
The vibrant red color is actually a result of a historical reaction where non alkalized cocoa reacted with acidic vinegar to turn reddish brown. Today, we use liquid food coloring to boost that visual, but the vinegar remains essential for that specific, tangy "velvet" mouthfeel.
| Premium Ingredient | Budget Alternative | Flavor Impact | Savings |
|---|---|---|---|
| Fresh Strawberry Puree | Frozen Strawberries | Same flavor, but frozen needs longer reducing to remove excess water | Save $3-5 depending on season |
| Pure Vanilla Extract | Vanilla Bean Paste | Paste adds beautiful black specks but extract provides the same classic aroma | Save $10-15 per bottle |
| Philadelphia Cream Cheese | Store Brand Cream Cheese | Store brands can sometimes be airier, leading to a less dense texture | Save $2-4 |
The choice of fat in your baking makes a massive difference in how the final product feels on the tongue. While butter is king for flavor in many dishes, the vegetable oil in this specific Red Velvet Strawberry Cheesecake is non negotiable for me.
It provides a "shatter proof" moisture that keeps the bottom layer feeling like a soft cushion for the cheesecake top.
The Details You Need First
Before you start cracking eggs, you need to understand that temperature is your best friend or your worst enemy in baking. I cannot tell you how many times I have tried to rush a cheesecake by using cold cream cheese, only to end up with a lumpy batter that looks like cottage cheese.
It just won't smooth out, no matter how much you whisk. Take the time to let everything sit on the counter for at least two hours.
| Ingredient | Science Role | Pro Secret |
|---|---|---|
| Buttermilk (1 cup) | Tenderizer | Sub with 1 cup milk + 1 tbsp lemon juice if you are in a pinch; let it sit 10 mins. |
| Cream Cheese (24 oz) | Structural Base | Use the full fat blocks only. low-fat versions have too much water and will weep. |
| Strawberry Puree (0.5 cup) | Natural Flavoring | Strain it through a fine mesh sieve to remove seeds for a "velvety" finish. |
If you are looking for more ways to use that extra cream cheese, you might love a classic Philadelphia Cream Cheese recipe that focuses purely on the tangy filling. For this dish, though, we are looking for that specific balance of fruit and cocoa.
The Elements of the Bake
The ingredient list might look long, but we can break it down into three distinct parts: the cake base, the cheesecake center, and the fresh topping. Using a scale for the flour and sugar will give you the most consistent results, especially with the 1.5 cups of all purpose flour.
The Red Velvet Base 1.5 cups All purpose flour (190g) Why this? Provides enough structure to support the heavy cheesecake layer without being tough. 1 cup Granulated sugar (200g) 1 tsp Baking soda 1 tbsp Unsweetened cocoa powder 0.5 tsp Salt 1 cup Buttermilk, room
temperature (240ml) 0.5 cup Vegetable oil (120ml) 1 Large egg, room temperature 1 tsp White distilled vinegar 1 tsp Vanilla extract 1.5 tbsp Liquid red food coloring
The Strawberry Cheesecake Filling 24 oz Philadelphia Cream Cheese, softened (680g) Why this? The high fat content ensures a silky, dense texture that won't crack. 1 cup Granulated sugar (200g) 3 Large eggs, room temperature 1 cup Sour cream (240g) 1 tsp Vanilla extract
0.5 cup Fresh strawberry puree, strained (120g)
The Fresh Topping 1 cup Fresh strawberries, hulled and sliced (150g) 2 tbsp Granulated sugar (25g) 1 tsp Lemon juice
Tools for the Best Result
You don't need a professional kitchen, but a few specific tools will make your life significantly easier. A 9 inch springform pan is non negotiable here. If you try to bake this in a regular cake pan, you will never get it out in one piece, and you will end up eating it with a spoon out of the tin (which is fine for a midnight snack, but not for a dinner party).
I also highly recommend using a stand mixer such as a KitchenAid or a powerful hand mixer. Beating 24 ounces of cream cheese by hand is a workout you probably don't want. You also want a large roasting pan that can fit your springform pan inside it for the water bath.
This "bain marie" method is the secret to a flat, crack free top.
Finally,, grab some heavy duty aluminum foil. You will need to wrap the bottom of your springform pan in at least three layers of foil to prevent the water from the bath from seeping into your Red Velvet Strawberry Cheesecake. Trust me, a soggy cake base is a tragedy you want to avoid at all costs.
Assembling Your Striking Layers
Success with this dessert is all about the "flow." You want to have your cake base par baked just enough that it can support the weight of the cheesecake batter without the two layers mixing into a pinkish purple sludge.
- Prep the oven. Preheat your oven to 350°F and grease your 9 inch springform pan thoroughly.
- Mix the dry base. Whisk together the 1.5 cups flour, 1 cup sugar, baking soda, cocoa powder, and salt. Note: Sifting the cocoa powder prevents those annoying little brown lumps.
- Combine the wet base. In a separate bowl, whisk the buttermilk, oil, 1 egg, vinegar, vanilla, and red food coloring.
- Form the red velvet. Pour the wet ingredients into the dry and whisk until just combined and no streaks of flour remain.
- Initial bake. Pour the batter into the pan and bake for 15 minutes until the edges are set but the center still has a slight wobble.
- Cream the cheese. While the base bakes, beat the 24 oz cream cheese and 1 cup sugar until completely smooth and silky.
- Add the dairy. Mix in the sour cream and vanilla, then add the 3 eggs one at a time, beating on low speed. Note: Beating on high speed incorporates air, which causes cracks.
- Swirl the fruit. Gently fold in the 0.5 cup strawberry puree.
- The final assembly. Pour the cheesecake mixture over the par baked red velvet base.
- The long bake. Place the pan in a water bath and bake at 325°F for 50-60 minutes until the edges are puffed and the center jiggles like set gelatin.
Once the bake is done, do not just yank it out of the oven. Turn the oven off, crack the door slightly, and let it sit in there for an hour. This gradual cool down is the most important step for preventing those heartbreaking cracks.
If you have extra berries left over, you should definitely try making a Blackberry Compote Recipe to serve on the side. The dark, tart berries contrast beautifully with the sweet strawberry swirl.
Avoid These Common Baking Mistakes
Cheesecake is notorious for being finicky, but most "failures" come from a few simple errors. The most common issue is the temperature of the ingredients. If your eggs are cold, they won't emulsify with the fat in the cream cheese, and you will see "sweating" on the top of your cake after it cools.
Why Your Cheesecake Cracked
If you see a giant canyon forming in the middle of your Red Velvet Strawberry Cheesecake, it usually means the oven was too hot or you over mixed the batter. When you beat too much air into the cream cheese, that air expands in the heat and then escapes, leaving a crack behind. Another culprit is a dry oven.
Without the steam from a water bath, the surface of the cheesecake dries out and loses its elasticity, causing it to snap as it expands.
Keeping the Base From Getting Soggy
A soggy base usually happens because the water bath leaked. Even with foil, water is sneaky. If you are worried about this, place the springform pan inside a slightly larger cake pan, and then place that pan into the water bath. It is a double barrier method that has saved many of my bakes.
| Problem | Root Cause | Solution |
|---|---|---|
| Lumpy Filling | Cold Cream Cheese | Microwave the blocks for 15 seconds or let them sit at room temp for 2 hours. |
| Red Base Bleeding | Base wasn't par baked | Ensure the base bakes for at least 15 minutes before adding the filling. |
| Surface Bubbles | Over mixing eggs | Tap the filled pan on the counter 5 times to release trapped air before baking. |
Common Mistakes Checklist:
- ✓ Always use room temperature eggs to ensure a smooth emulsion.
- ✓ Wrap your pan in at least three layers of heavy duty foil for the water bath.
- ✓ Never open the oven door during the first 45 minutes of the cheesecake bake.
- ✓ Ensure the strawberry puree is reduced and thickened before adding to the batter.
- ✓ Let the cheesecake chill in the fridge for at least 6 hours (preferably overnight).
Flavor Swaps and Simple Switches
I am a big fan of making a recipe work for what you have in the pantry. If you don't have fresh strawberries, you can use a high-quality strawberry preserve. Just reduce the sugar in the cheesecake filling by 2 tablespoons to account for the extra sweetness in the jam.
If you want to change the visual look, you can leave the strawberry puree out of the main batter and instead dollop it on top, using a toothpick to create a marbled effect. It looks stunning and gives you little concentrated bursts of fruit flavor.
For those who want a truly decadent experience, serving this with ChocolateCovered Strawberries Recipe on top takes it from a "family dessert" to a "five star hotel" experience.
| Original Ingredient | Substitute | Why It Works |
|---|---|---|
| Sour Cream | Greek Yogurt (Full fat) | Similar tang and moisture. Note: Crumb may be slightly denser. |
| Vegetable Oil | Melted Coconut Oil | Adds a very subtle nutty note; keeps the base moist when cold. |
| White Vinegar | Apple Cider Vinegar | Provides the same acidity needed for the red velvet reaction. |
Keeping Your Dessert Fresh Longer
Storing a Red Velvet Strawberry Cheesecake correctly is the difference between a great leftover slice and a soggy mess. This cake actually tastes better on the second day because the moisture from the cheesecake migrates slightly into the red velvet base, making it incredibly tender.
- Fridge
- Keep the cheesecake in the springform pan or an airtight container for up to 5 days. Cover it loosely with plastic wrap to prevent it from absorbing fridge odors.
- Freezer
- You can freeze this! Slice it first, wrap each slice in parchment paper, then foil, and place in a freezer bag. It stays good for up to 3 months. Thaw in the fridge overnight before eating.
- Zero Waste Tip
- If the edges of your red velvet base get a little dry, crumble them up and mix with a spoonful of frosting to make red velvet cake pops. Or, toss the crumbs over vanilla ice cream for a quick sundae.
Perfect Drinks and Toppings
When you are serving something this rich, you want a drink that can cut through the fat. A sharp, dry Prosecco is a fantastic pairing because the bubbles cleanse the palate between bites of the dense cream cheese. If you prefer coffee, go for a dark roast or an espresso.
The bitterness of the coffee highlights the small amount of cocoa powder in the red velvet base.
For toppings, less is usually more. A light dusting of powdered sugar or a few curls of white chocolate can add a touch of elegance without overwhelming the strawberry flavor. If your strawberry topping looks a little dull, a quick brush of warmed apricot jam will give it that professional "mirror glaze" shine.
Chef's Note: If you want to get really fancy, save a few tablespoons of the red velvet batter before baking. Bake it in a small separate tin, crumble it up, and sprinkle the red crumbs around the edge of the finished cheesecake for a beautiful color contrast.
- If you want a firmer texture, bake the cheesecake 5 minutes longer and skip the sour cream.
- If you want a more intense red, use gel food coloring instead of liquid; it is much more concentrated.
- If you want a cleaner slice, dip your knife in hot water and wipe it dry between every single cut.
This Red Velvet Strawberry Cheesecake is a labor of love, but the look on people's faces when you bring it to the table is worth every minute of prep. It is balanced, beautiful, and surprisingly doable once you know the science behind the layers. Go ahead, give it a try your kitchen is waiting!

Recipe FAQs
Can I skip the water bath (bain marie) for this cheesecake?
No, a water bath is essential for this bake. It provides necessary steam to prevent the surface of the cheesecake from drying out and cracking as it sets, ensuring a smooth texture.
Why is my red velvet base staining the white cheesecake layer?
This happens if the base is under baked. You must par bake the red velvet base for at least 15 minutes so the structure is solid enough to support the heavier filling layer without mixing.
How to ensure the cheesecake filling is perfectly smooth, not lumpy?
Ensure all dairy ingredients are completely at room temperature. Cold cream cheese will not emulsify properly with the eggs, leading to small lumps that won't smooth out during baking.
Is it true that using butter instead of oil in the cake base will make it better?
False. Vegetable oil is specifically recommended for the red velvet layer. Oil keeps the cake base exceptionally moist even when chilled next to the dense cheesecake, whereas butter can become hard.
How do I achieve the best texture in the strawberry puree layer?
Strain the fresh strawberry puree through a fine mesh sieve. This removes the seeds and excess water, giving you a clean, velvety fruit swirl that incorporates beautifully.
What is the secret to avoiding sunken centers after cooling?
Gradually reduce the heat after baking is complete. Turn the oven off, crack the door slightly, and let the cheesecake cool inside for a full hour before removing it to room temperature.
Can I substitute the buttermilk with regular milk?
Yes, but you must add acid to simulate buttermilk. Mix 1 cup of regular milk with 1 tablespoon of white vinegar or lemon juice and let it sit for 10 minutes before using in the recipe.
Red Velvet Strawberry Cheesecake
Ingredients:
Instructions:
Nutrition Facts:
| Calories | 548 kcal |
|---|---|
| Protein | 8.2 g |
| Fat | 34.1 g |
| Carbs | 52.7 g |
| Fiber | 1.1 g |
| Sugar | 35.4 g |
| Sodium | 362 mg |
