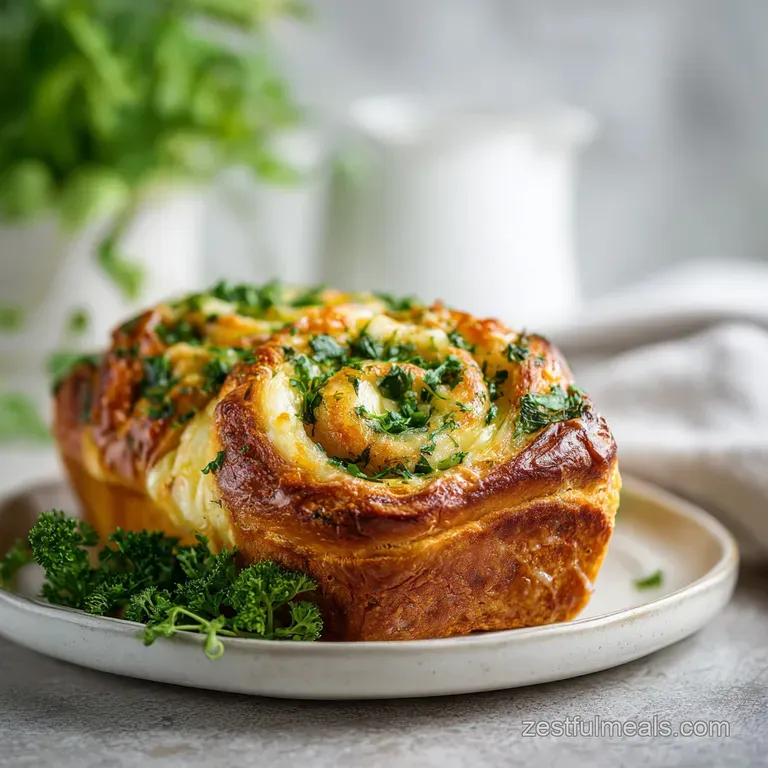
Swirled Garlic Herb and Cheese Bread: Savory and Crisp

- Time:20 minutes active + 150 minutes rising/resting = Total 170 minutes
- Flavor/Texture Hook: Velvety melted cheese with a mahogany, shatter crisp crust
- Perfect for: Game night appetizers or a cozy family dinner side
- Get Perfect Swirled Garlic Herb and Cheese Bread
- The Blueprint for a Cheesy Rise
- Selecting the Right Savory Elements
- Simple Tools for Better Baking
- Baking Your Cheese Bread Step-by-Step
- Fixing Your Bread Baking Blunders
- Flavor Twists and Ingredient Swaps
- Storage and Waste Free Guidelines
- Best Pairings for Cheesy Bread
- Recipe FAQs
- 📝 Recipe Card
Get Perfect Swirled Garlic Herb and Cheese Bread
The first thing that hits you isn't actually the taste, it's that smell. You know the one, where the garlic starts to toast in the oven and the butter begins to brown, filling every single room of the house with a scent that basically screams "comfort food." I remember the first time I tried this, I was way too cautious with the rolling.
I didn't roll the dough thin enough, and the result was a thick, doughy center that felt more like a steamed bun than a professional loaf. It was a total letdown until I realized the secret is in the stretch.
Discover how to make this incredible Swirled Garlic Herb and Cheese Bread with 10 Steps to Pure Bliss. Once you get the hang of the "roll and pinch" technique, you'll see that you don't need a fancy bakery oven or a degree in pastry arts to get those beautiful, swirling ribbons of cheese.
You just need a bit of patience while the yeast does its thing and a willingness to get your hands a little floury.
Believe it or not, there's a common myth that you need a stand mixer to get a smooth dough for this kind of bread. Honestly, forget that. Your hands are actually better tools for feeling when the dough has reached that "elastic" stage.
We're going to keep this simple, focusing on a few reliable movements that guarantee a soft, airy result every single time.
The Blueprint for a Cheesy Rise
When you're baking, it's easy to just follow the steps, but knowing why the dough behaves the way it does helps you avoid those "why is it flat?" moments. This bread relies on a few basic reactions to get that signature texture.
- Yeast Activation
- Warm water wakes up the dormant yeast, allowing it to eat the sugar and release carbon dioxide. This is what creates the bubbles that make the bread light.
- Gluten Development
- Kneading the dough aligns the proteins into a strong network. This network traps the gas from the yeast, giving the loaf its structure and chew.
- Fat Layering
- The butter and cheese act as barriers. As they melt, they create tiny gaps in the dough, resulting in a velvety interior rather than a dense block.
- Oven Spring
- The sudden heat of the oven causes the gas to expand rapidly before the crust sets. This gives the bread its final lift and that gorgeous mahogany color.
Right then, let's look at how different shaping methods change the final result. While the log method is the classic, you can tweak it depending on what you're after.
| Method | Time | Texture | Best For |
|---|---|---|---|
| Log in Pan | 30 min | Soft sides, tender crumb | Classic slices |
| Baking Sheet | 25 min | Crispy all around | Pull apart style |
| Braided Log | 35 min | Denser, more structure | Special occasions |
It's interesting how a simple change in the pan can change the entire mouthfeel. If you're using a baking sheet, you get more surface area for the cheese to caramelize, which is a win in my book.
Selecting the Right Savory Elements
Not all ingredients are created equal when it's time to build a swirl. You want a mix of fats and flavors that won't make the dough too soggy but will still deliver a punch of garlic.
| Ingredient | Science Role | Pro Secret |
|---|---|---|
| Active Dry Yeast | Leavening agent | Use warm, not hot water to avoid killing the yeast |
| Sharp Cheddar | Flavor & Fat | Grate it yourself; pre shredded has cornstarch that stops it from melting smoothly |
| Unsalted Butter | Moisture & Tenderness | Use softened, not melted, for a thicker paste that doesn't soak into the dough |
| Mozzarella | Stretch & Bind | Provides that classic "cheese pull" and holds the swirl together |
For the ingredients, keep it simple but high quality. Don't even bother with low-fat cheese here - you'll lose that velvety texture and the flavor will be flat.
- 3 cups (375g) All purpose flour Why this? Standard protein content for a balanced chew
- 1 cup (240ml) Warm water Why this? Activates yeast without scalding
- 2 ¼ tsp (7g) Active dry yeast Why this? Reliable rise and classic bread aroma
- 1 tbsp (12g) Granulated sugar Why this? Feeds the yeast and helps browning
- 1 tsp (6g) Fine sea salt Why this? Controls yeast growth and enhances flavor
- 2 tbsp (28g) Olive oil Why this? Keeps the dough supple
- ½ cup (113g) Unsalted butter, softened Why this? Creates the fat barrier for the swirl
- 3 tbsp (15g) Fresh garlic, minced Why this? Far more pungent than powdered garlic
- 2 tbsp (6g) Fresh parsley, finely chopped Why this? Adds a fresh, herbal contrast
- 1 tsp (1g) Dried oregano Why this? Classic Italian style depth
- ½ tsp (3g) Black pepper Why this? Subtle heat to cut through the fat
- 1 cup (115g) Sharp cheddar cheese, shredded Why this? Strong, salty punch
- 1 cup (115g) Mozzarella cheese, shredded Why this? For the melt and stretch
- ¼ cup (15g) Grated Parmesan Why this? Adds a salty, crispy crust finish
Simple Tools for Better Baking
You don't need a kitchen full of gadgets for this. In fact, I prefer using the basics because it's easier to clean up. A large mixing bowl is your main hub, and a rolling pin is the only "special" tool you really need. If you don't have a rolling pin, a clean wine bottle or a smooth thermos works just fine.
I've found that using a damp cloth to cover the dough is way better than plastic wrap. It allows the dough to breathe slightly while keeping the surface from drying out and forming a skin. Also, if you have a kitchen scale, use it for the flour.
Measuring by the cup can be tricky because you might pack the flour too tightly, which leads to a dry, heavy loaf.
Trust me on this: greasing your pan is not optional. I once forgot to grease my loaf pan and spent ten minutes frantically trying to wiggle the bread out, only to have a chunk of the crust stay stuck to the metal. It was a heartbreaking moment.
Use a bit of olive oil or a non stick spray to make sure the release is seamless.
Baking Your Cheese Bread step-by-step
Let's get into the actual process. To keep this as a Garlic Herb and Cheese Bread with 10 Steps to Pure Bliss, I've combined a few of the smaller prep movements.
- Activate the yeast. Stir the sugar and yeast into warm water and let sit for 5-10 minutes until it becomes foamy. Note: If it doesn't foam, your yeast might be dead; start over with fresh yeast.
- Mix the dry base. Combine flour and salt in a large bowl, then pour in the yeast mixture and olive oil.
- Knead the dough. Stir until a shaggy dough forms, then knead by hand or with a mixer for 5-7 minutes until smooth and elastic. Note: It should bounce back slowly when you poke it.
- The first rise. Place dough in a greased bowl, cover with a damp cloth, and let rise in a warm spot for 60-90 minutes until doubled in size.
- Prep the herb butter. Mash together softened butter, minced garlic, parsley, oregano, and pepper to form a thick paste.
- Roll the dough. Punch down the risen dough and roll it on a floured surface into a 10x16 inch rectangle.
- Fill and layer. Spread the garlic herb butter evenly across the dough, leaving a ½-inch border, then sprinkle with shredded cheddar and mozzarella.
- Create the swirl. Roll the dough into a tight log starting from the long edge and pinch the seam shut. Note: A tight roll prevents the cheese from leaking out too much.
- Final proof. Place the log in a greased loaf pan or on a parchment lined baking sheet, cover, and let rise for 30 minutes.
- Bake to finish. Preheat the oven to 375°F (190°C). Brush the top with melted butter, sprinkle with Parmesan, and bake for 25-30 minutes until mahogany colored.
Let the bread rest for 10 minutes before slicing. I know it's tempting to dive in immediately, but the internal structure needs to set, or you'll end up with a gummy texture.
Fixing Your Bread Baking Blunders
Bread can be finicky, but most "fails" have a very simple cause. Usually, it comes down to temperature or timing.
Dough Refusing to Rise
If your dough is still the same size after an hour, your environment is likely too cold. Yeast loves warmth. Try putting the bowl inside an oven (turned off!) with a pan of steaming water on the rack below. This creates a makeshift proofing box.
Cheese Leaking Out
This usually happens because the roll wasn't tight enough or the seam wasn't pinched shut. When the cheese melts, it looks for the path of least resistance. Ensure you pinch that seam firmly, almost like you're sealing a burrito.
Crust Burning Too Fast
If the top is getting too dark but the center still feels soft, your oven might be running hot. You can loosely tent the loaf with aluminum foil for the last 10 minutes of baking to protect the crust.
| Problem | Root Cause | Solution |
|---|---|---|
| Gummy interior | Slicing too soon | Let rest 10 full minutes |
| Dense, heavy loaf | Under kneaded | Knead until dough is smooth and bouncy |
| No browning | Old yeast or low temp | Ensure oven is preheated to 375°F |
To make sure your Herb and Cheese Bread with 10 Steps to Pure Bliss comes out perfectly, keep this checklist in mind before you start:
- ✓ Check yeast expiration date before mixing
- ✓ Use a thermometer to ensure water is between 105°F and 115°F
- ✓ Pat the dough surface lightly before adding butter to prevent sliding
- ✓ Roll the dough as thin as possible without tearing it
- ✓ Don't skip the second rise; it's the key to the airy texture
Flavor Twists and Ingredient Swaps
One of the best things about this recipe is how flexible it is. Once you've mastered the base, you can really play around with the fillings to match whatever you're serving.
If you want a bit more punch, try adding a teaspoon of red pepper flakes to the garlic butter for a spicy kick. For a more Mediterranean feel, swap the cheddar for feta and add some chopped kalamata olives to the swirl. It turns the bread into something that feels a bit more like an appetizer platter.
| Original Ingredient | Substitute | Why It Works |
|---|---|---|
| All purpose flour | Bread flour | Higher protein. Note: Creates a chewier, more professional crust |
| Sharp Cheddar | Gruyère | Nuttier flavor. Note: Melts slightly differently but tastes more refined |
| Fresh Parsley | Fresh Cilantro | Zesty twist. Note: Best if pairing with Mexican or Thai dishes |
| Olive Oil | Melted Butter | Richer taste. Note: Can make the dough slightly softer |
If you're looking for something to dip this bread into, a Homemade Alfredo Sauce is an absolute winner. The creaminess of the sauce cuts through the sharp cheddar and garlic perfectly.
For those who want a lighter version, you can reduce the butter by half and add a tablespoon of Greek yogurt to the dough. It won't be quite as "shattering" on the outside, but it still keeps a lovely softness.
Storage and Waste Free Guidelines
Homemade bread doesn't have the preservatives that store-bought loaves do, so you have to be a bit more strategic about how you store it.
Keep the bread in an airtight container or a zip top bag at room temperature for up to 2 days. If you're not going to finish it by then, the freezer is your best friend. Slice the bread first, then freeze the slices with pieces of parchment paper between them.
This way, you can just pop a single slice into the toaster without having to thaw the whole loaf.
To reheat, avoid the microwave if you can. The microwave makes the bread rubbery. Instead, use a toaster oven or a skillet with a tiny bit of butter. This brings back that crispy, shatter like crust that makes the loaf so special.
Regarding zero waste, don't toss your garlic butter scraps. If you have leftover herb butter in the bowl, freeze it in an ice cube tray. You can drop a cube of this garlic gold into a pan of sautéing shrimp or toss it over steamed vegetables for an instant flavor boost.
Even the flour dusted parchment paper can be composted if it's not coated in too much grease.
Best Pairings for Cheesy Bread
This bread is a powerhouse on its own, but it really shines when it's part of a larger spread. Because it's so rich, you want to pair it with things that have a bit of acidity or a clean protein to balance the fat.
A fresh arugula salad with a lemon vinaigrette is a great companion. The bitterness of the greens and the zip of the lemon cut right through the richness of the mozzarella and cheddar. It cleanses the palate between bites of the bread.
If you're planning a full meal, this is a fantastic side for a seafood dish. I highly recommend pairing it with Garlic Parmesan Halibut for a dinner that feels like a treat but is still easy to put together. The buttery notes of the bread complement the flaky white fish beautifully.
For a more casual get together, set up a "dip station." Place the sliced bread in the center of a platter and surround it with marinara sauce, honey (for a sweet and salty vibe), and a creamy spinach dip. It's an easy way to feed a crowd without spending the whole night in the kitchen.
Just remember to serve the bread warm - it's a completely different experience when the cheese is still melty.
Recipe FAQs
How to store the bread to keep it fresh?
Store in an airtight container at room temperature for up to 2 days. For longer preservation, slice the loaf first and freeze slices with parchment paper between them to prevent sticking.
What dishes pair well with this garlic cheese bread?
It works perfectly as a side for roasted vegetables. If you enjoyed the savory garlic profile here, it complements the flavors in roasted garlic eggplant.
Is it true that I must use a bread machine to get the dough smooth?
No, this is a common misconception. You can achieve a smooth and elastic texture by kneading by hand or with a mixer for 5 7 minutes.
How to reheat sliced garlic cheese bread?
Toast individual slices in a toaster or oven. Avoid using a microwave, as it often ruins the bread's texture.
Why didn't my dough double in size during the first rise?
Ensure your water is warm, not hot. Water that is too hot kills the yeast, while water that is too cold prevents activation during the 60 90 minute rising period.
How to achieve a mahogany colored crust?
Brush the top with melted butter and sprinkle with Parmesan. Bake at 375°F (190°C) for 25 30 minutes until the loaf reaches a deep golden brown.
How to roll the dough for the swirl effect?
Roll the dough into a tight log starting from the long edge. Pinch the seam shut firmly before placing it in the pan to ensure the herb and cheese layers stay contained.
Swirled Garlic Herb Cheese Bread

